 |
 Installing the Duplex Unit Installing the Duplex Unit
 Removing the Duplex Unit Removing the Duplex Unit
For specifications or details about the paper types and sizes that you can use with the Duplex Unit, see Duplex Unit.
Installing the Duplex Unit
Follow the steps below to install the optional Duplex Unit.
 |
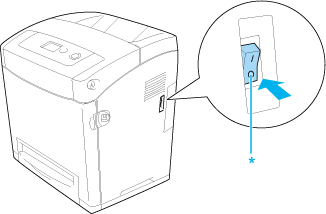
Turn off the printer.
|
 |
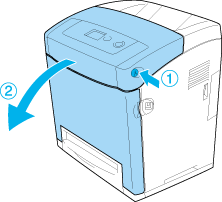
Press the latch on the front cover and open the cover.
|
 |  |
Caution: |
 |
Remove the cap from the connector.
|

 |
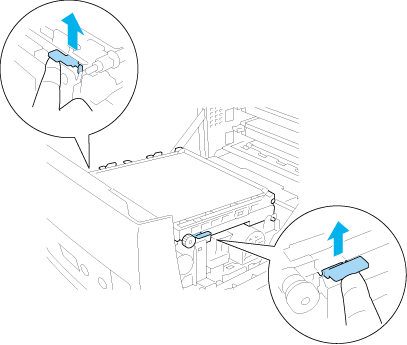
Pull up the blue tabs on both sides of the transfer unit.
|
 |  |
Caution: |
 |  |
|
Do not touch the transfer belt on the transfer unit to avoid damaging it.
|
|
 |
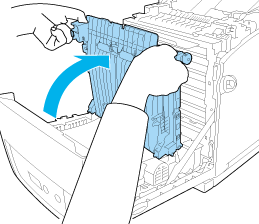
Raise the transfer unit.
|
 |
Take the Duplex Unit out of its package.
|
 |
Insert the tabs on the Duplex Unit into the printer, align the arrow marks and push it down to connect the connector.
|

 |
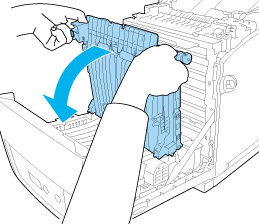
Pull down the transfer unit.
|
 |
Close the front cover.
|
 |
Turn on the printer.
|
To confirm that the option is installed correctly, print a Status Sheet. See Printing a Status Sheet.
 |
Note: |
 |
|
The printer cannot recognize the Duplex Unit if it's cover has not been removed. Make sure that the cover was removed as explained in step 3.
|
|
 |
Note for Windows users: |
 |
|
If EPSON Status Monitor is not installed, you have to make settings manually in the printer driver. See Making Optional Settings.
|
|
 |
Note for Macintosh users: |
Follow the steps below to remove the optional Duplex Unit.
 |
Turn off the printer.
|
 |
Press the latch on the front cover and open the cover.
|
 |
Pull up the blue tabs on both sides of the transfer unit.
|
 |
Raise the transfer unit.
|
 |
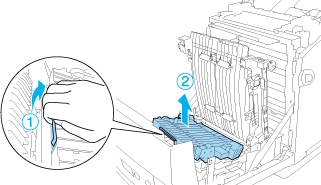
Grasp the handle to unlock the Duplex Unit and remove it from the printer.
|
 |
Pull down the transfer unit.
|
 |
Turn on the printer.
|
|  |


 Installing the Duplex Unit


 Top
Top