|

Network Guide
|
|
Network Software / EpsonNet Print
Adding a Port Using the Add Printer Wizard (Windows XP/Server 2003/2000/NT 4.0)
If you are using Windows XP/Server 2003/2000/NT 4.0, you can also add a port using the Add Printer Wizard. Follow the steps below to add a port using the Add Printer Wizard.
 |
For Windows XP: Click Start and then Printers and Faxes. Under Printer Tasks, click Add a printer to start the Add Printer Wizard.
|
For Windows Server 2003: Click Start and then Printers and Faxes. Double-click Add Printer in the Printers folder to start the Add Printer Wizard.
For Windows 2000: Click Start, point to Settings, and then select Printers. Double-click Add Printer in the Printers folder to start the Add Printer Wizard.
For Windows NT 4.0: Click Start, point to Settings, and then select Printers. Double-click the Add Printers icon.
 |
Click Next.
|
 |
For Windows XP/Server 2003: Click Local printer attached to this computer, clear the Automatically detect and install my Plug and Play printer check box, and then click Next. Select the Create a new port radio button, and then select EpsonNet Print Port from the list. Click Next.
|
For Windows 2000: Click Local printer, clear the Automatically detect and install my Plug and Play printer check box, and then click Next. Select the Create a new port radio button, and then select EpsonNet Print Port from the list. Click Next.
For Windows NT 4.0: Select the My Computer radio button, and then click Next. Click the Add Port button in the Add Printer wizard dialog box. Select EpsonNet Print Port from the Available Printer Port list, and then click the New Port button.
 |
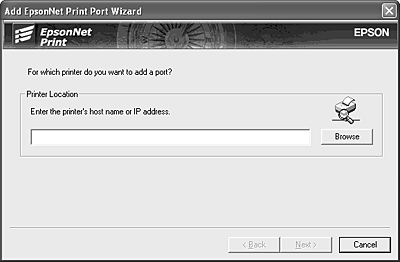
Click the Browse button to find the printer. Then, go to the next step.
|
Or, you can enter the host name or IP address of the printer (up to 127 characters). The following example shows how you can enter the information:
IP address: 192.168.100.201
Host name: AL-CXXXX-XXXXXX
FQDN: AL-CXXXX-XXXXXX.epson.com
(XXXXXX are the last 6 digits of the MAC address.)
Then go to step 6.

 |
Select the target printer, and then click OK.
|

 |  |
Note:
|
 |  | -
If the target printer is not in the list, click the Refresh button to search the printers using new parameters.
|
|
 |  | -
If you want to search specific printers, click the Filter Options check box, and then specify your favorable options.
|
|
 |  | -
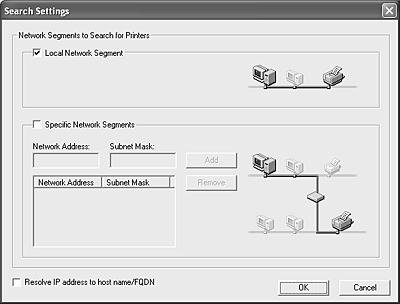
If you want to search printers in other segments, click the N/W Settings button. Select the Specific Network Segments check box, and then enter the network address and subnet mask of the network segment for the search. Then click the Add button. If you want to resolve the IP address to the host name or FQDN, select the Resolve IP address to host name/FQDN check box.
|
|

 |
Click Next.
|
 |
Click Finish to complete adding a port.
|
 |
Select the model name of the printer, and then click Next.
|
 |  |
Note:
|
 |  | |
If the Add Printer wizard asks you to select either Keep existing driver or Replace existing driver, be sure to select the Replace existing driver radio button. Click Next.
|
|
 |
Enter the printer name, and then click OK.
|
 |
Select the Do not share this printer radio button (Windows XP/Server 2003/2000) or the Not shared radio button (Windows NT 4.0). Click Next.
|
 |
Select Yes to print a test page; otherwise, select No. Click Next.
|
 |
Click Finish to complete the installation.
|
 |  |
Note:
|
Now, the printer is ready for peer to peer printing. To configure the printer port, go to Configuring the Printer Port.

[Top]
| Version NPD0677-00, Copyright © 2004, SEIKO EPSON CORPORATION |