 |
 | Clearing Jammed Paper |
 |
 Precautions for clearing jammed paper Precautions for clearing jammed paper
 Jam A (cover A) Jam A (cover A)
 Jam A, B (cover A and B) Jam A, B (cover A and B)
 Jam MP, A (MP tray and cover A) Jam MP, A (MP tray and cover A)
 Jam A, C1 (cover A and standard lower paper cassette) Jam A, C1 (cover A and standard lower paper cassette)
 Jam A, E, C2 (cover A, E, and optional paper cassette) Jam A, E, C2 (cover A, E, and optional paper cassette)
If paper becomes jammed in the printer, the printer’s LCD panel and EPSON Status Monitor 3 provide alert messages.
| Precautions for clearing jammed paper |
Be sure to observe the following points when you clear jammed paper.
 |
Warning: |
 |
-
Be careful not to touch the fuser, which is marked CAUTION HIGH TEMPERATURE, or the surrounding areas. If the printer has been in use, the fuser and the surrounding areas may be very hot.
|
|
 Top Top
Follow the steps below to clear paper jams at cover A.
 |
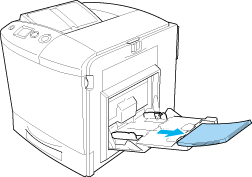
Remove all paper that is loaded on the MP tray.
|
 |
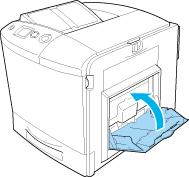
Close the MP tray.
|
 |  |
Note: |
 |  |
|
Close the expansion trays, if needed, before closing the MP tray.
|
|
 |
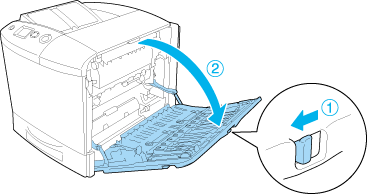
Push the latch on cover A to the left and open the cover until it stops.
|
 |
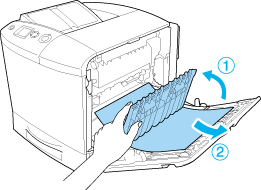
If the optional Duplex Unit is not installed, gently pull out any sheets of paper. Be careful not to tear the jammed paper.
|
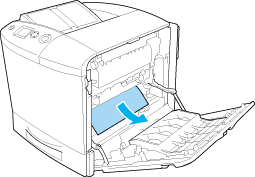
If the optional Duplex Unit is installed, lift up the Duplex Unit. Hold it and gently pull out any sheets of paper. Be careful not to tear the jammed paper.
 |  |
Warning: |
 |  |
|
Be careful not to touch the fuser, which is marked CAUTION HIGH TEMPERATURE, or the surrounding areas. If the printer has been in use, the fuser and the surrounding areas may be very hot. If you must touch one of these areas, open cover A and B, then wait 30 minutes to allow the heat to subside before doing so.
|
|
 |
Close cover A. Then open the MP tray and reload the paper.
|
 Top Top
Follow the steps below to clear paper jams at cover A and B.
 |
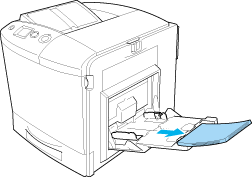
Remove all paper that is loaded on the MP tray.
|
 |
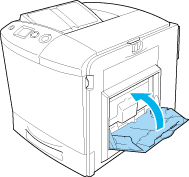
Close the MP tray.
|
 |  |
Note: |
 |  |
|
Close the expansion trays, if needed, before closing the MP tray.
|
|
 |
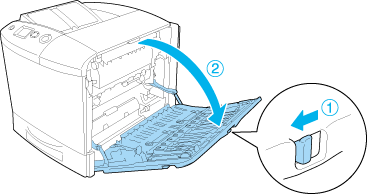
Push the latch on cover A to the left and open the cover until it stops.
|
 |
If the optional Duplex Unit is not installed, gently pull out any sheets of paper. Be careful not to tear the jammed paper.
|
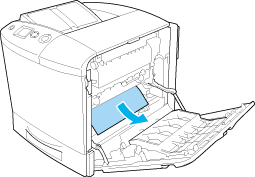
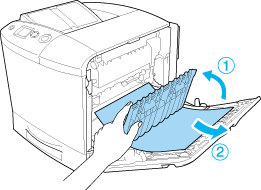
If the optional Duplex Unit is installed, lift up the Duplex Unit. Hold it and gently pull out any sheets of paper. Be careful not to tear the jammed paper.
 |  |
Warning: |
 |  |
|
Be careful not to touch the fuser, which is marked CAUTION HIGH TEMPERATURE, or the surrounding areas. If the printer has been in use, the fuser and the surrounding areas may be very hot. If you must touch one of these areas, open cover A and B, then wait 30 minutes to allow the heat to subside before doing so.
|
|
 |
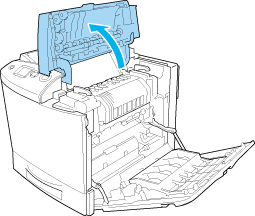
Open cover B.
|
 |
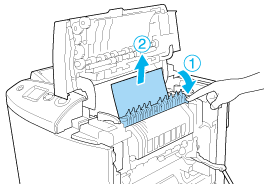
Hold the guide up by holding the green tab, and gently pull out any sheets of paper. Be careful not to tear the jammed paper.
|
 |  |
Warning: |
 |  |
|
Be careful not to touch the fuser, which is marked CAUTION HIGH TEMPERATURE, or the surrounding areas. If the printer has been in use, the fuser and the surrounding areas may be very hot. If you must touch one of these areas, open cover A and B, then wait 30 minutes to allow the heat to subside before doing so.
|
|
If you can remove the paper, close covers B and A. If you cannot remove the paper, go to the next step.
 |
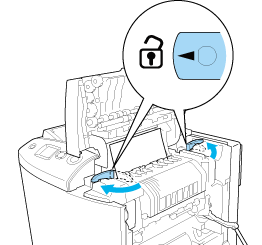
Turn the handles on both sides of the fuser unit to unlock them.
|
 |  |
Warning: |
 |  |
|
Be careful not to touch the fuser, which is marked CAUTION HIGH TEMPERATURE, or the surrounding areas. If the printer has been in use, the fuser and the surrounding areas may be very hot. If you must touch one of these areas, open cover A and B, then wait 30 minutes to allow the heat to subside before doing so.
|
|
 |
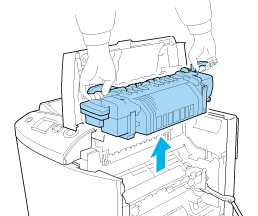
Lift the fuser unit out of the printer.
|
 |
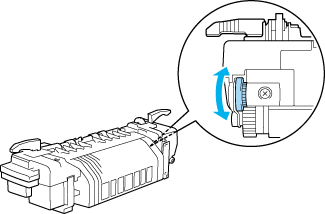
Remove the paper. If the paper is still jammed in the fuser, turn the green knob on the back of the fuser to remove it.
|
 |
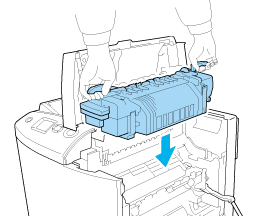
Lower the fuser unit into the printer making sure that the guide posts slide into the holes on the bottom of the unit.
|
 |
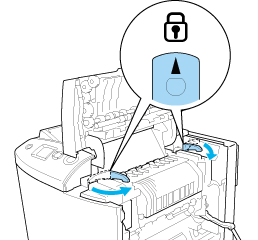
Turn the handles on both sides of the fuser unit to lock them.
|
 |
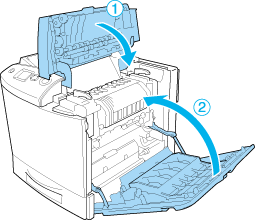
Close covers B and A.
|
 |
Open the MP tray and reload the paper.
|
 Top Top
| Jam MP, A (MP tray and cover A) |
Follow the steps below to clear paper jams at the MP tray and cover A.
 |
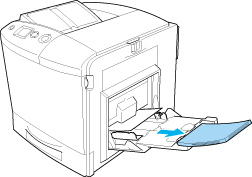
Remove all paper that is loaded on the MP tray.
|
 |
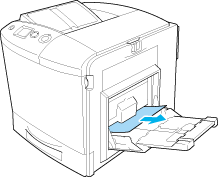
Gently pull out any sheets of paper that have fed part way into the printer.
|
 |
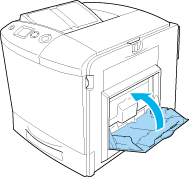
Close the MP tray.
|
 |  |
Note: |
 |  |
|
Close the expansion trays, if needed, before closing the MP tray.
|
|
 |
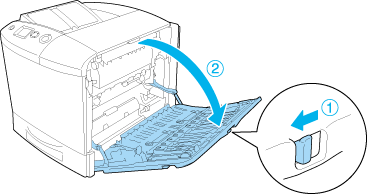
Push the latch on cover A to the left and open the cover until it stops.
|
 |
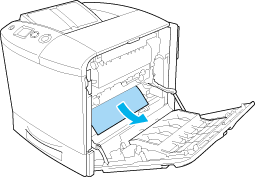
If the optional Duplex Unit is not installed, gently pull out any sheets of paper. Be careful not to tear the jammed paper.
|
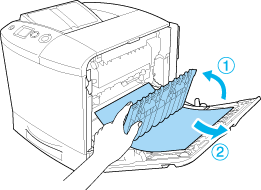
If the optional Duplex Unit is installed, lift up the Duplex Unit. Hold it and gently pull out any sheets of paper. Be careful not to tear the jammed paper.
 |  |
Warning: |
 |  |
|
Be careful not to touch the fuser, which is marked CAUTION HIGH TEMPERATURE, or the surrounding areas. If the printer has been in use, the fuser and the surrounding areas may be very hot. If you must touch one of these areas, open cover A and B, then wait 30 minutes to allow the heat to subside before doing so.
|
|
 |
Close cover A. Then open the MP tray and reload the paper.
|
 Top Top
| Jam A, C1 (cover A and standard lower paper cassette) |
Follow the steps below to clear paper jams at cover A and the standard lower paper cassette.
 |
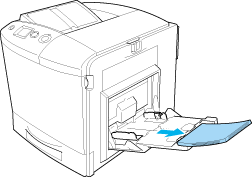
Remove all paper that is loaded on the MP tray.
|
 |
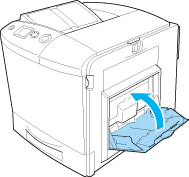
Close the MP tray.
|
 |  |
Note: |
 |  |
|
Close the expansion trays, if needed, before closing the MP tray.
|
|
 |
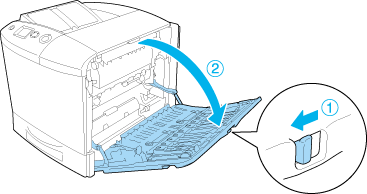
Push the latch on cover A to the left and open the cover until it stops.
|
 |
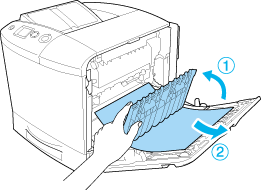
If the optional Duplex Unit is not installed, gently pull out any sheets of paper. Be careful not to tear the jammed paper.
|
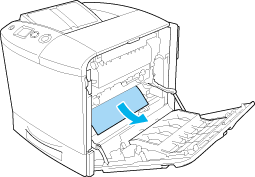
If the optional Duplex Unit is installed, lift up the Duplex Unit. Hold it and gently pull out any sheets of paper. Be careful not to tear the jammed paper.
 |  |
Warning: |
 |  |
|
Be careful not to touch the fuser, which is marked CAUTION HIGH TEMPERATURE, or the surrounding areas. If the printer has been in use, the fuser and the surrounding areas may be very hot. If you must touch one of these areas, open cover A and B, then wait 30 minutes to allow the heat to subside before doing so.
|
|
 |
Close cover A.
|
 |
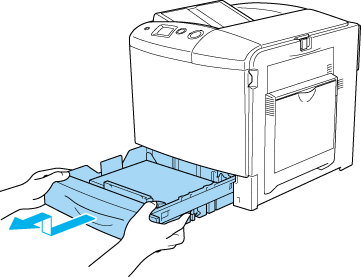
Pull out the standard paper cassette. Then pull the cassette upward to remove it from the printer.
|
 |
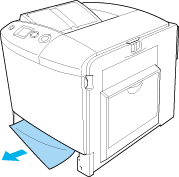
Gently pull out any sheets of paper that have fed part way into the printer.
|
 |
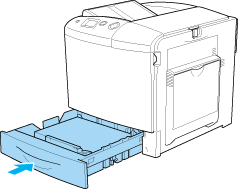
Reinsert the paper cassette.
|
 |
Open the MP tray and reload the paper.
|
 Top Top
| Jam A, E, C2 (cover A, E, and optional paper cassette) |
Follow the steps below to clear paper jams at cover A, C, and the optional paper cassette.
 |
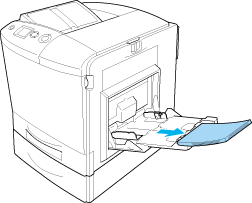
Remove all paper that is loaded on the MP tray.
|
 |
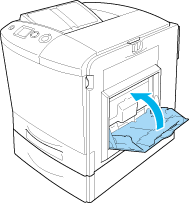
Close the MP tray
|
 |  |
Note: |
 |  |
|
Close the expansion trays, if needed, before closing the MP tray.
|
|
 |
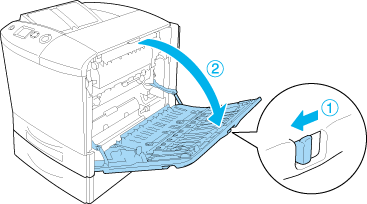
Push the latch on cover A to the left and open the cover until it stops.
|
 |
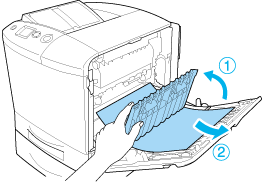
If the optional Duplex Unit is not installed, gently pull out any sheets of paper. Be careful not to tear the jammed paper.
|
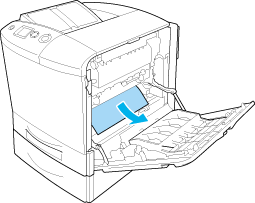
If the optional Duplex Unit is installed, lift up the Duplex Unit. Hold it and gently pull out any sheets of paper. Be careful not to tear the jammed paper.
 |  |
Warning: |
 |  |
|
Be careful not to touch the fuser, which is marked CAUTION HIGH TEMPERATURE, or the surrounding areas. If the printer has been in use, the fuser and the surrounding areas may be very hot. If you must touch one of these areas, open cover A and B, then wait 30 minutes to allow the heat to subside before doing so.
|
|
 |
Close cover A.
|
 |
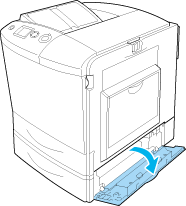
Open cover E.
|
 |
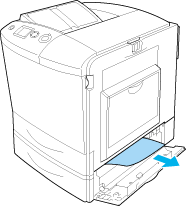
Gently pull out any sheets of paper that have fed part way into the printer.
|
 |
Close cover E.
|
 |
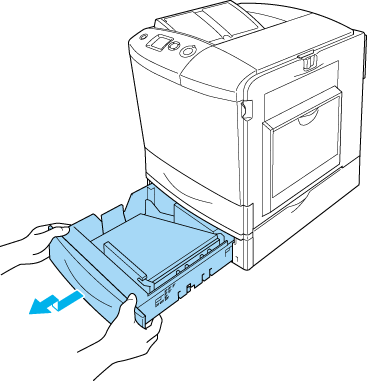
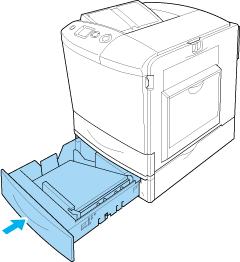
Pull out the optional paper cassette. Then pull the cassette upward to remove it from the optional paper cassette unit.
|
 |
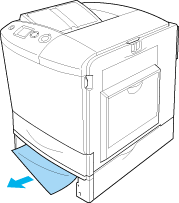
Gently pull out any sheets of paper that have fed part way into the printer.
|
 |
Reinsert the paper cassette into the optional paper cassette unit.
|
 |
Open the MP tray and reload the paper.
|
 Top Top
|  |


 Precautions for clearing jammed paper
 Top
Top


