|

Reference Guide
|
|
Maintenance and Transportation
Replacing the Paper Cutter
When the paper cutter does not cut cleanly, it may be blunt and require replacement.
 |
Warning:
|
 | |
Be careful not to cut yourself while replacing the paper cutter.
|
|
To confirm the product code of the Auto Cutter Spare Blade, see Consumable Products.
To replace the paper cutter, follow these steps.
 |
Make sure that the printer is on.
|
 |
Press the Menu  button to enter SelecType mode. button to enter SelecType mode.
|
 |
Press the Paper Feed  or Paper Feed or Paper Feed  button to display MAINTENANCE on LCD. button to display MAINTENANCE on LCD.
|
 |
Press the Menu button, and press the Paper Feed or Paper Feed button to display CUTTER REPL.
|
 |
Press the Menu button to display EXEC. Press the Menu button again. The paper cutter holder moves to the replacement position.
|
|  |
Caution:
|
| | |
Never move the paper cutter holder by hand. Otherwise, damage to your printer may occur.
|
|
 |
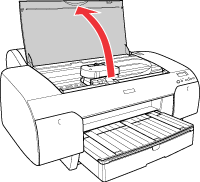
When the print head stops at the replacement position, OPEN TOP COVER is displayed. Open the top cover.
|
 |
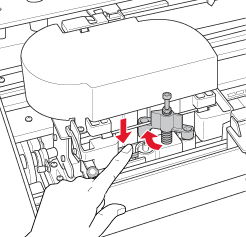
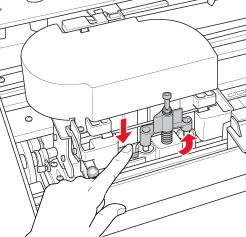
When REPLACE CUTTER is displayed on the LCD, push in the side pin and turn the paper cutter cover to the right to open the casing.
|
 |
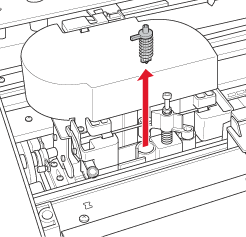
Slowly take your finger off the side pin, and carefully remove the old cutter from the printer.
|
 |
Remove the new paper cutter from its package.
|
 |
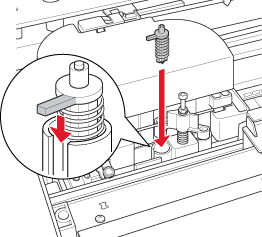
Fully insert the new cutter into the paper cutter holder. Make sure the cutter slide pin is set to the left.
|
 |
While pushing in the side pin, turn the paper cutter cover to the left to close the casing.
|
|  |
Note:
|
| | |
Make sure that the paper cutter cover is set correctly. Otherwise, the paper may not be cut.
|
|
 |
Make sure that CLOSE TOP COVER is displayed, then close the top cover. The cutter holder moves to the home (far right) position.
|
 |
Wait until READY is displayed on the LCD.
|

[Top]
| Version 1.10E, Copyright © 2004, SEIKO EPSON CORPORATION |

