 |
 |
|
||
 |
||||
Using Cut Sheet Media
Checking the paper path
The paper path changes according to the media type you use. Always check the media type and its paper path.
Paper path list
|
Paper Path
|
Media Name
|
|
Auto Sheet Feeder
|
Premium Glossy Photo Paper
|
|
Premium Semigloss Photo Paper
|
|
|
Premium Luster Photo Paper
|
|
|
Photo Quality Ink Jet Paper
|
|
|
Epson Proofing Paper White Semimatte
|
|
|
Archival (Enhanced) Matte Paper
|
|
|
Plain paper
|
|
|
Rear Manual Feed Slot
|
Watercolor Paper - Radiant White
|
|
UltraSmooth Fine Art Paper
|
|
|
Velvet Fine Art Paper
|
Loading cut-sheet media
You can load cut-sheet media into the Auto Sheet Feeder, front manual feed slot, or rear manual feed slot.
The front manual feed slot and rear manual feed slot can hold only one sheet at a time.
The Auto Sheet Feeder can hold up to 120 sheets of plain paper. Do not load paper above the arrow mark on the inside surface of the left edge guide.
For information on the loaded capacity of Epson special media in the Auto Sheet Feeder, see the following table.
|
Epson special media
|
Size
|
Loadable capacity in the Auto Sheet Feeder
|
|
Premium Glossy Photo Paper
|
89 × 127 mm
|
20
|
|
5 × 7 in
|
20
|
|
|
102 × 181 mm
|
20
|
|
|
8 × 10 in
|
20
|
|
|
4 × 6 in
|
20
|
|
|
11 × 14 in
|
10
|
|
|
LTR
|
20
|
|
|
A4
|
20
|
|
|
A3
|
10
|
|
|
Super A3/B
|
10
|
|
|
A2
|
1
|
|
|
US C
|
1
|
|
|
Premium Semigloss Photo Paper
|
4 × 6 in
|
20
|
|
LTR
|
20
|
|
|
A4
|
20
|
|
|
A3
|
10
|
|
|
Super A3/B
|
10
|
|
|
A2
|
1
|
|
|
USC
|
1
|
|
|
Premium Luster Photo Paper
|
LTR
|
20
|
|
A3
|
10
|
|
|
Super A3/B
|
10
|
|
|
A2
|
1
|
|
|
US C
|
1
|
|
|
Photo Quality Ink Jet Paper
|
A4
|
60
|
|
LTR
|
60
|
|
|
LGL
|
50
|
|
|
US B
|
50
|
|
|
A3
|
50
|
|
|
Super A3
|
50
|
|
|
A2
|
10
|
|
|
US C
|
10
|
|
|
Epson Proofing Paper White Semimatte
|
Super A3/B
|
1
|
|
Archival (Enhanced) Matte Paper
|
LTR
|
20
|
|
A4
|
20
|
|
|
A3
|
10
|
|
|
Super A3/B
|
10
|
|
|
A2
|
1
|
|
|
US C
|
1
|
Loading paper from the Auto Sheet Feeder
Follow the steps below to load the paper from the Auto Sheet Feeder.
 |
Make sure the printer is on and in the READY state.
|
 |
Extend the paper guide according to the paper size.
|

 |
Push the output tray cover, and then open it by hand fully.
|


 |
Raise and pull out the output tray extension while pulling it out.
|

 Note:
Note:|
Make sure to raise the output tray until the triangle mark on the output tray matches with the triangle mark on the right side of the printer.
|
 |
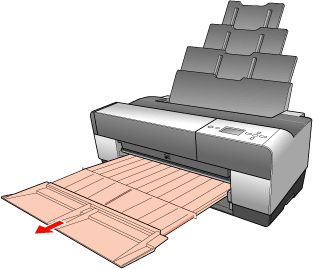
Pull out the output tray extension according to the paper size. If you do not extend it properly, the printout may fall.
|
 |
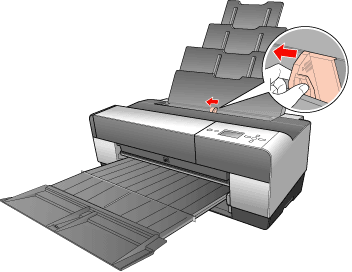
Slide the edge guide to the left so it is slightly wider than the width of your paper.
|
 |
Fan a stack of paper, and then tap it on a flat surface to even the edges.
|
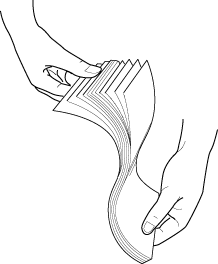
If the paper is curled, flatten it before you load it. If it curls excessively and jams frequently, stop using it.
 |
Hold the left and right edges of the paper. Align the right edge of the paper to the right, and then insert the paper until it meets resistance. Slide the edge guide to fit to the left side of the paper.
|
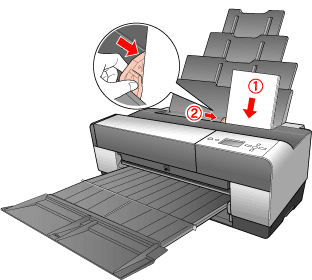
Now, the printer is ready to print.
 Caution:
|
During printing the edge guide automatically moves 3 mm to the outside. Do not move it back manually.
Do not leave the paper in the printer for a long period of time; its quality will deteriorate. We recommend that you remove the paper from the printer after printing.
|
 Note:
Note:|
If a paper skew occurs when printing on A3 or larger plain paper, use the edge guide located on the right side of the Auto Sheet Feeder to load the paper straight.
 |
Loading paper into the front manual feed slot
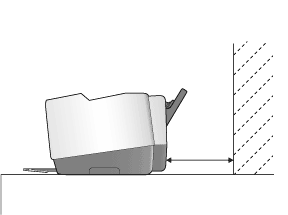
As the printer feeds paper from the front side to the rear side of the printer, keep enough space between the rear side of the printer and the wall, according to the following table.
|
Paper size
|
Space
|
|
A2
|
450 mm
|
|
Super A3/B
|
340 mm
|
|
A3
|
280 mm
|
|
A4
|
160 mm
|
 Note:
Note:|
When PAPER SIZE CHECK is set to OFF on the printer’s control panel, you cannot feed paper from the manual feed slot. See PAPER SIZE CHECK for details.
When you print on a thick paper (1.2 to 1.5 mm), always load the sheet from the front manual feed slot.
You can load a sheet of A4/Letter to A2 size.
Load one sheet at a time into the front feed slot.
Load paper with the printable surface up.
|
 |
Make sure the printer is on and in the READY state.
|
 |
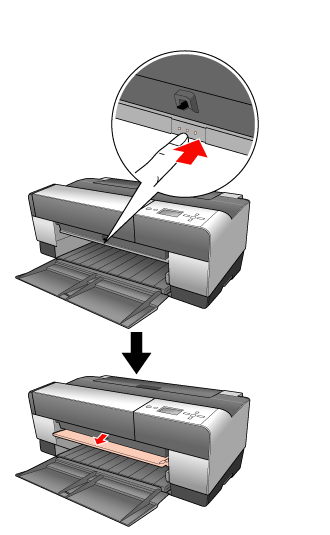
Push the front manual tray a little harder, then the front manual tray is pushed out.
|
 |
Insert a sheet to where paper is usually ejected.
|
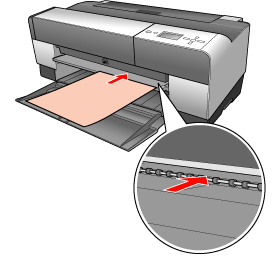
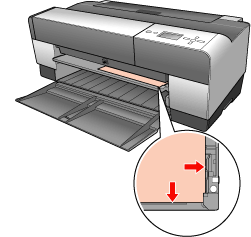
 |
Adjust the right edge of the paper resting against the right side of the front manual tray, and also align the bottom edge of the paper with the white line.
|
 |
Press the Paper Feed/Down
 button to feed the paper to the printing position. button to feed the paper to the printing position. |

 |
Pull out the output tray extension according to the paper size. If you do not extend it properly, the printout may fall.
|
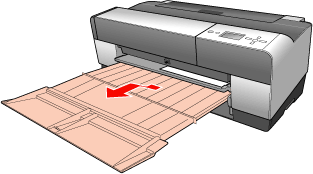
Now, the printer is ready to print.
 Caution:
|
Do not leave the paper in the printer for a long period of time; its quality will deteriorate. We recommend that you remove the paper from the printer after printing.
|
 Note:
Note:|
Store the front manual tray by pushing it in when you are not printing from the front manual feed slot.
|
Loading paper into the rear manual feed slot
 Note:
Note:|
You can load a sheet of A4/Letter to A2/USC size with a thickness of 0.29 to 0.5 mm.
Load one sheet at a time into the rear feed slot.
Load paper with the printable surface up.
|
 |
Make sure the printer is on and in the READY state.
|
 |
Attach the rear sheet guide to the back of the printer.
|


 |
Slide the edge guide to the left so it is slightly wider than the width of your paper.
|
 |
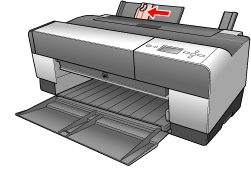
Using the rear sheet guide, insert the paper into the rear manual feed slot flush with the right edge guide.
|
 |
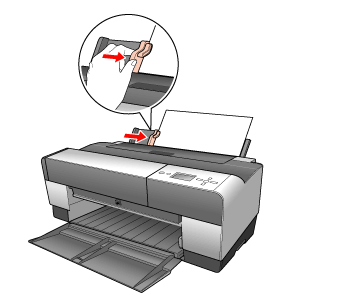
Slide the edge guide on the rear sheet guide until it is flush with the paper.
|
 |
Guide the paper into the slot and feed it into the printer until it meets resistance. Maintain a constant pressure against the paper (approx. 3 seconds) until you feel the printer pull the paper in slightly.
|

The printer automatically feeds the paper to the printing position.
 Note:
Note:|
If you want to remove the paper, press the Paper Feed/Down
 button to back feed the paper. button to back feed the paper. |
 |
Pull out the output tray extension according to the paper size.
|

Now, the printer is ready to print.
 Caution:
|
Do not leave the paper in the printer for a long period of time; its quality will deteriorate. We recommend that you remove the paper from the printer after printing.
|
