 |
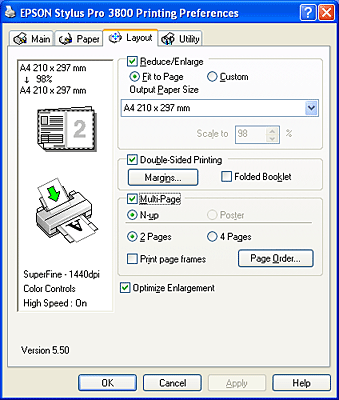
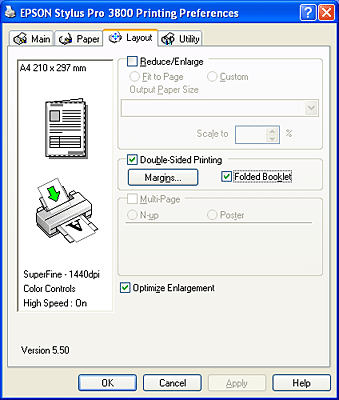
Making Settings on the Layout Menu
 Making the Reduce/Enlarge setting Making the Reduce/Enlarge setting
Making Double-Sided Printing setting
Making Multi-Page settings
Making the Optimize Enlargement setting
You can make the Reduce/Enlarge, Double-Sided Printing, Multi-Page, and Optimize Enlargement settings on this menu.
 |
Note: |
|
|
According to the paper source you choose, some of the functions are not available.
|
|
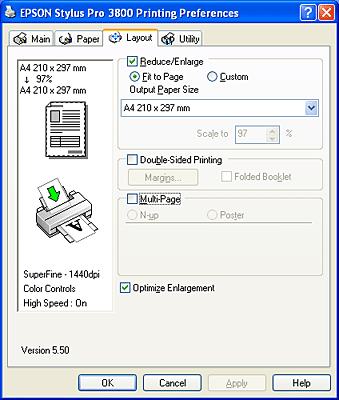
Making the Reduce/Enlarge setting
You can fit the size of your data to the size of paper you to print on. To enable this function, select Reduce/Enlarge. When this function is enabled, you can make the following settings.
|
Fit to Page
|
Proportionally enlarges or reduces the size of your data to make it fit the paper size you have selected in the Output Paper Size.
|
|
Custom
|
Lets you define the percentage you want to enlarge or reduce a data. Click the arrows next to the Scale box to select a proportion from 10 to 400%.
|
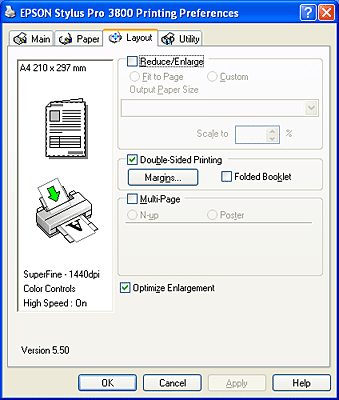
Making Double-Sided Printing setting
You can perform double-sided printing. There are two types of double-sided printing available. Standard double-sided printing allows you to print the odd-numbered pages first. Once these pages are printed, the paper can be reloaded for printing the even-numbered pages onto the opposite side of the paper.
You can also perform Folded Booklet double-sided printing. It lets you make single-fold booklets.
|
Note: |
|
-
The double-sided printing feature is not available when the printer is accessed over a network or used as a shared printer, Status Monitor 3 is not installed, or your system is not configured to support bi-directional communication.
|
|
Standard double-sided printing
To print odd and even numbered pages on the opposite sides of a sheet, follow the steps below.
 |
Select Double-Sided Printing.
|
 |
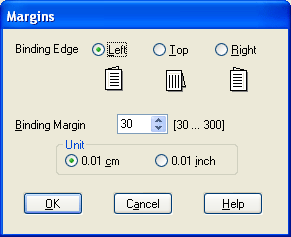
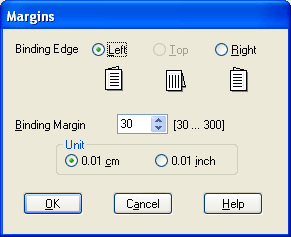
Click Margins. The following dialog box appears.
|
 |
Specify the edge of the paper where binding will be placed. You can choose Left, Top, or Right.
|
 |
Specify the width of the binding margin, using the Binding Margin text box. You can specify any width from 3 to 30 mm.
|
| |
Note: |
| |
|
The actual binding margin may vary depending on the settings specified in your application. We recommend that you test the print quality before printing the entire job.
|
|
 |
Click OK to return to the Layout menu, and then click OK to save your settings.
|
 |
Make sure paper is loaded, and then send a print job from your application. Instructions for generating the even-numbered pages will be displayed while the odd-numbered pages are output.
|
 |
Follow the on-screen instructions and reload the paper.
|
| |
Note: |
 |
Once the paper is reloaded, click Resume to print the even-numbered pages.
|
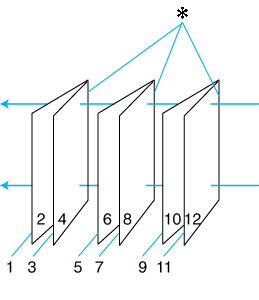
Folded Booklet double-sided printing
You can also make single-fold booklets using the double-sided printing feature. When you create a single-fold booklet, the pages that appear on the outside (after the booklet is folded) are printed first. The pages that will appear inside the booklet can then be printed after the paper is reloaded into the printer.
 Binding Edge Binding Edge
A booklet can be created by printing pages 1 and 4 on the first sheet of paper, pages 5 and 8 on the second sheet of paper, and pages 9 and 12 on the third sheet of paper. After these sheets are reloaded into the sheet feeder, you can then print pages 2 and 3 on the back of the first sheet of paper, pages 6 and 7 on the back of the second sheet of paper, and pages 10 and 11 on the back of the third sheet of paper. The resulting pages can then be folded and bound together into a booklet.
To create the booklet, follow the steps below.
|
|
Select Double-Sided Printing, and then select Folded Booklet.
|
|
|
Click Margins. The Margins dialog box appears.
|
|
|
Specify the edge of the paper where binding will be placed. You can choose Left, Top, or Right.
|
| |
Note: |
| |
|
When Portrait is selected as the Orientation setting on the Paper menu, Left or Right binding positions are available. The Top binding position is supported when Landscape is selected as the Orientation setting.
|
|
|
|
Specify the width of the binding margin, using the Binding Margin text box. You can specify any width from 3 to 30 mm. The specified margin width will be used on both sides of the fold. For example, if a 10-mm margin is specified, a 20-mm margin will be inserted. (A margin of 10 mm will be placed on each side of the fold.)
|
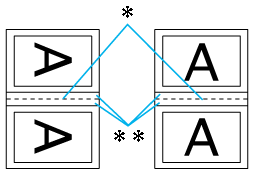
Folding Edge
Margin
|
|
Click OK to return to the Layout menu, and then click OK to save your settings.
|
|
|
Make sure paper is loaded, and then send a print job from your application.
|
|
|
Instructions for printing the inside pages will be displayed while the outside pages are output. Follow the on-screen instructions to reload the paper.
|
| |
Note: |
|
|
Once the paper is reloaded, click Resume to print the inside pages.
|
 |
Once printing is complete, fold the sheets and bind them together using a stapler or other binding method.
|
Making Multi-Page settings
Selecting Multi-Page lets you choose between the N-up and Poster settings.
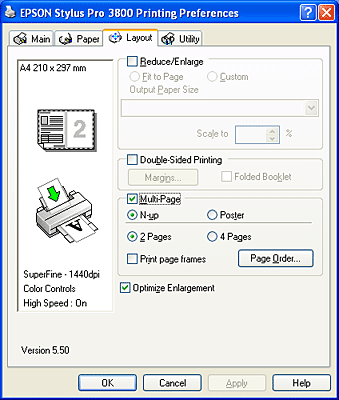
Select N-up as the Multi-Page setting to print two or four pages of your document on one sheet of paper.
When N-up is selected, you can make the following settings.
|
2 Pages
4 Pages
|
Prints two or four pages of your data on a single sheet of paper.
|
|
Page Order
|
Opens the Print Layout dialog box, where you can specify the order in which the pages will be printed. Some settings may be unavailable, depending on the Orientation selection on the Paper menu.
|
|
Print page frames
|
Prints frames around the pages printed on each sheet.
|
A single page can be enlarged to cover 4, 9, or 16 printed sheets of paper. Select Poster as the Multi-Page setting to print a poster-size image.
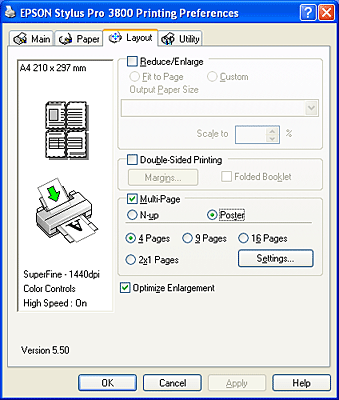
Click Settings to adjust the way your poster will print. The Poster Settings dialog box opens.

You can make the following settings.
|
Print Cutting Guides
|
Check this box to turn the cutting guide options on.
|
|
Overlapping Alignment Marks
|
Slightly overlaps the images and prints alignment markers so that they can be aligned more precisely.
|
|
Trim Lines
|
Prints border lines on the images to guide you when trimming the pages.
|
If you only want to print a few of the panels without printing the entire poster, click the panels that you do not want to print, and then click OK to close the Poster Settings dialog box.
If you have selected the Borderless check box in the Paper menu, the following dialog box appears.

Making the Optimize Enlargement setting
Select this check box to optimize an enlargement to achieve long poster or panoramic printing without using a particular application. Clear this check box if text or graphics are distorted; however, output length may be limited depending on the application.
| |


 Top
Top