 |
 |
|
||
 |
||||
Confirming Your Network Settings with a Computer
Before the printer can be connected to the network, components such as TCP/IP must be installed and a valid IP address and subnet mask must be configured on the computer.
Confirming TCP/IP settings
Follow the procedure below to verify that the TCP/IP protocol is installed and the addresses and other settings are configured.
For Windows 7/Vista/XP
 |
Click the Start button, Network, Network and Sharing Center then Manage network connections.
|
Windows XP: Click Start, click Explorer, and click Control Panel then Network Connections.
 |
Right-click the following icon and then click Properties.
|
Wireless connection --> Wireless Network Connection icon
Wired connection --> Local Area Connection
Wired connection --> Local Area Connection
 Note:
Note:|
For Windows Vista, if the User Account Control dialog box is displayed, click Continue.
|
 |
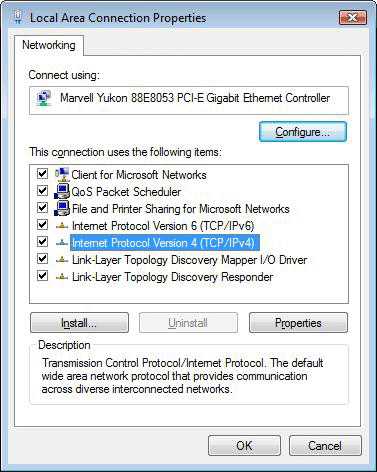
Check whether the TCP/IP protocol (Internet protocol) is installed on the computer.
|
 Note:
Note:|
If the TCP/IP protocol is already installed and the checkbox is selected, go to step 4 and check the settings including the addresses.
If the TCP/IP protocol is not installed, click Install to install the TCP/IP protocol. When installing, the operating system CD-ROM may be required.
|
 |
Double-click Internet Protocol Version 4 (TCP/IPv4).
|
Windows XP: Double-click Internet Protocol (TCP/IP).

 |
Configure the required settings and click OK.
|
 Note:
Note:|
To assign an IP address to the computer automatically when using a DHCP server or router/access point (wireless router, etc.) with the DHCP function, select Obtain an IP address automatically.
Set up a DNS server if necessary. (For details, contact your service provider and network administrator.)
|
 |
Restart the computer.
|
For Mac OS X
 |
From the Apple menu, select System Preferences.
|
 |
Click the Network icon.
|
 |
Mac OS X 10.4: Select an option appropriate for your environment from Show.
|
For a wired connection: Select Built-in Ethernet.
For a wireless connection: Select AirPort.
Mac OS X 10.5/10.6: Select an appropriate setting for your environment from the left-hand side of the Network screen.
For a wired connection: Select Ethernet.
For a wireless connection: Select AirPort.
 |
Mac OS X 10.4: Verify that Automatic is selected in Location, then click the TCP/IP tab.
|
Mac OS X 10.5/10.6: Click the Advanced button.
 |
Mac OS X 10.4: Configure the required settings in the TCP/IP tab. After setting, click Apply Now.
|
Mac OS X 10.5/10.6: Configure the required settings on the TCP/IP tab. After making your settings, click OK, and then click Apply.
 Note:
Note:|
To assign an IP address to the computer automatically when using a DHCP server or router/access point (wireless router, etc.) with the DHCP function, select Using DHCP from Configure IPv4.
Set up a DNS server if necessary. (For details, contact your service provider and network administrator.)
|
