 |
 |
|
||
 |
||||
Checking the Print Head Nozzles
If you find that the printout is unexpectedly faint or that dots are missing, you may be able to identify the problem by checking the print head nozzles.
You can check the print head nozzles from your computer by using the Nozzle Check utility or from the printer by using the buttons.
Using the Nozzle Check utility for Windows
Follow the steps below to use the Nozzle Check utility.
 |
Make sure that no lights are indicating errors, and that the front cover is closed.
|
 |
Make sure that A4 size paper is loaded in the sheet feeder.
|
 |
Right-click the printer icon on the taskbar, then select Nozzle Check.
|
If the printer icon does not appear, refer to the following section to add the icon.
 |
Follow the on-screen instructions.
|
Using the Nozzle Check utility for Mac OS X
Follow the steps below to use the Nozzle Check utility.
 |
Make sure that no lights are indicating errors, and that the front cover is closed.
|
 |
Make sure that A4 size paper is loaded in the sheet feeder.
|
 |
Access the EPSON Printer Utility2 dialog box.
|
 |
Click the Nozzle Check button in the Utility dialog box.
|
 |
Follow the on-screen instructions.
|
Using the printer buttons
Follow the steps below to check the print head nozzles using the printer buttons.
 |
Make sure that no lights are indicating errors, and that the front cover is closed.
|
 |
Turn off the printer.
|
 |
Make sure that A4 size paper is loaded in the sheet feeder.
|
 |
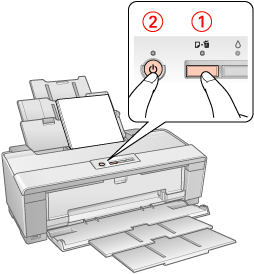
Hold down the
 paper button and press the paper button and press the  power button to turn on the printer. power button to turn on the printer. |

 |
When the printer turns on, release both the buttons. The printer prints the nozzle check pattern.
|
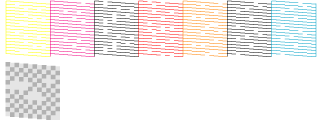
Below are two sample nozzle check patterns.
Compare the quality of the printed check page with the sample shown below. If there are no print quality problems, such as gaps or missing segments in the test lines, the print head is fine.

If any segment of the printed lines is missing, as shown below, this could mean a clogged ink nozzle or a misaligned print head.


 See
See