 |
 |
|
||
 |
||||
Printing Documents

Loading paper
Refer to the section below for details on loading paper.
When using special Epson paper, refer to the section below.
Printer settings for Windows
 |
Open the file you want to print.
|
 |
Access the printer settings.
|

 |
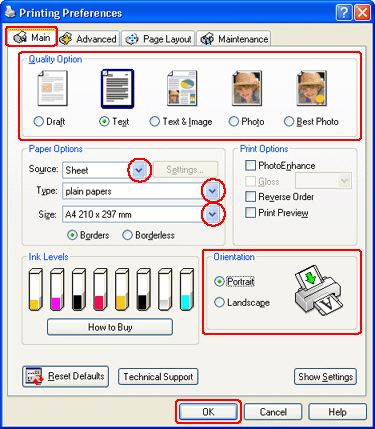
Click the Main tab, then select one of the following Quality Option settings:
|
Draft for rough drafts with reduced print quality
Text for text-only documents with higher text quality
Text & Image for higher quality documents with text and images
 |
Select Sheet as the Source setting.
|
 |
Select the appropriate Type setting.
|
 |
Select the appropriate Size setting. You can also define a custom paper size. For details, see the online help.
|
 |
Select Portrait (tall) or Landscape (wide) to change the orientation of your printout.
|
 |
Click OK to close the printer settings window.
|
 |
Print your file.
|
Printer settings for Mac OS X
 |
Open the file you want to print.
|
 |
Access the Page Setup dialog box.
|

 |
Select the printer you are using as the Format for setting.
|
 |
Select the appropriate Paper Size and Orientation settings. You can also define a custom paper size. For details, see the online help.
|
 |
Click OK to close the Page Setup dialog box.
|
 |
Access the Print dialog box.
|

 |
Select the printer you are using as the Printer setting. Then make the Copies & Pages settings.
|
 |
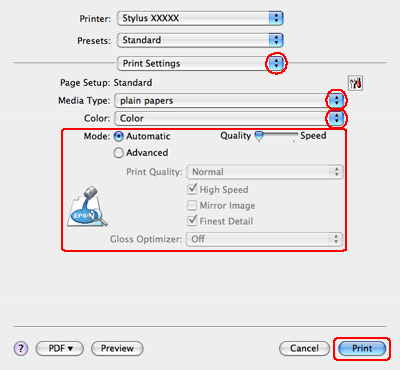
Select Print Settings from the pop-up menu.
|

 |
Select the appropriate Media Type, Color, and Mode settings. See online help for details of Print Settings.
|
 |
Click Print to start printing.
|
