 |
 |
|
||
 |
||||
Replacing an Expended Ink Cartridge
You can replace an ink cartridge using the printer buttons or using your computer. Refer to the appropriate section below for instructions.
 Note:
Note:|
Do not open the ink cartridge package until you are ready to install it in the printer. The cartridge is vacuum packed to maintain its reliability.
|
Using the printer buttons
This table describes the status of the lights and the actions you need to take.
|
Lights
|
Action
|
 |
Obtain a replacement ink cartridge.
|
 |
Replace the expended ink cartridge.
|
 flashing,
  on
onTo replace an ink cartridge using the  ink button, follow the steps below.
 ink button, follow the steps below.
 Caution:
|
Do not remove the cartridge from the printer until you are ready to replace it with another.
|
 Note:
Note:|
The illustrations show replacement of the black ink cartridge, but the instructions are the same for all the cartridges.
|
 |
Make sure the
 power light is on, but not flashing. power light is on, but not flashing. |
 |
Open the printer cover.
|
 |
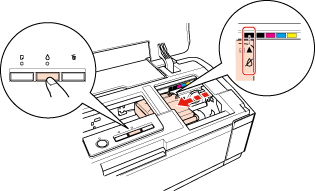
Press the
 ink button. The print head moves to the ink cartridge check position and the ink button. The print head moves to the ink cartridge check position and the  power light begins to flash. The ink cartridge indicated by the power light begins to flash. The ink cartridge indicated by the  mark is either expended or low. mark is either expended or low. |
 Caution:
|
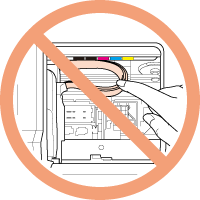
Do not move the print head by hand, as this may damage the printer. Always press the
 ink button to move it. ink button to move it.Be careful not to touch the white flat cable inside the printer.
 |
 Note:
Note:|
If an ink cartridge is low, you may continue to use it until it is expended. To confirm the status of each ink cartridge, see one of the following sections:
 See Using EPSON Status Monitor 3 (Windows) See Using EPSON Status Monitor 3 (Windows) See Using EPSON StatusMonitor (Mac OS X) See Using EPSON StatusMonitor (Mac OS X)Do not hold the
 ink button for more than three seconds, or the printer may start cleaning the print head. ink button for more than three seconds, or the printer may start cleaning the print head. |
 |
Press the
 ink button again. ink button again. |
If more than one ink cartridge is expended or low, the print head moves to the  mark. This occurs each time you press the
  ink button until all expended or low ink cartridges have been indicated.
 mark. This occurs each time you press the
  ink button until all expended or low ink cartridges have been indicated.
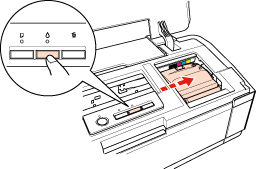
Once all of the expended or low ink cartridges have been indicated, the print head moves to the ink cartridge replacement position when you press the  ink button.
 ink button.
 |
For best results, shake the new ink cartridge four or five times before opening the package.
|

 |
Remove the new ink cartridge from the package.
|
 Caution:
|
Be careful not to break the hooks on the side of the ink cartridge when you remove it from the package.
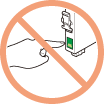
Do not touch the green IC chip on the side of the cartridge. This can damage the ink cartridge.
 Always install an ink cartridge immediately after removing the old cartridge. If the cartridge is not installed promptly, the print head may dry out and be unable to print.
|
 |
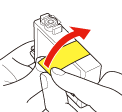
Remove the yellow tape from the bottom of the ink cartridge.
|
 Caution:
|
You must remove the yellow tape from the cartridge before installing it; otherwise, print quality may decline or you may not be able to print.
If you have installed an ink cartridge without removing the yellow tape, take the cartridge out of the printer, remove the yellow tape, and then reinstall it.
Do not remove the transparent seal from the bottom of the cartridge; otherwise, the cartridge may become unusable.
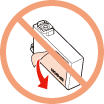
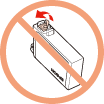 Do not remove or tear the label on the cartridge; otherwise, ink will leak.
 |
 |
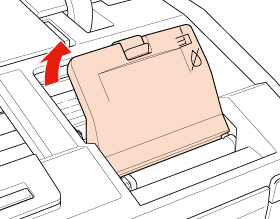
Open the cartridge cover.
|
 Caution:
|
Be careful not to touch the parts highlighted below.
 |
 |
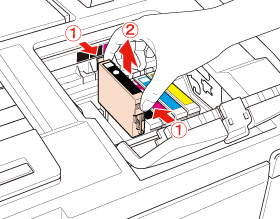
Squeeze the tab at the back of the ink cartridge that you want to replace. Lift the cartridge straight up and out of the printer. Dispose of it properly.
|
 Note:
Note:|
If it is difficult to remove the cartridge, lift the cartridge with more force until it comes out.
|
 |
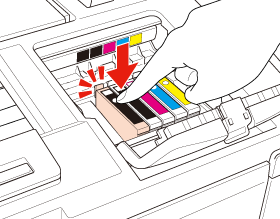
Place the ink cartridge into the cartridge holder with the bottom down. Then push down the ink cartridge until it clicks into place.
|
 |
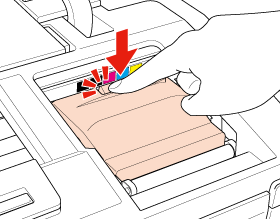
When you are finished replacing cartridges, close the cartridge cover until it clicks into place and the printer cover.
|
 |
Press the
 ink button. ink button. |
The printer moves the print head and begins charging the ink delivery system. This process takes about two and a half minutes to complete. When ink charging is finished, the print head returns to its home position. The  power light stop flashing and remains on, and the
  ink light goes out.
 power light stop flashing and remains on, and the
  ink light goes out.
 Caution:
|
The
 power light continues to flash while the printer is charging ink. Never unplug the printer or turn off the power while this light is flashing. Doing so can result in incomplete charging of ink. power light continues to flash while the printer is charging ink. Never unplug the printer or turn off the power while this light is flashing. Doing so can result in incomplete charging of ink. |
 Note:
Note:|
If the
 ink light is flashing or is on after the print head moves to its home position, the ink cartridge may not be installed properly. Press the ink light is flashing or is on after the print head moves to its home position, the ink cartridge may not be installed properly. Press the  ink button again, press the ink cartridge down until it clicks into place, and then close the cartridge cover firmly. ink button again, press the ink cartridge down until it clicks into place, and then close the cartridge cover firmly. |
Using your computer
You can monitor the ink cartridge status from your computer and view on-screen instructions for replacing a low or expended ink cartridge.
When you need to replace an ink cartridge, click How to in the status monitor window. Follow the on-screen instructions to replace the cartridge.
For more information on using your computer to replace ink cartridges, see the section below.
 See Using EPSON Status Monitor 3 (Windows)
 See Using EPSON StatusMonitor (Mac OS X)
 See Using EPSON Status Monitor 3 (Windows)
  See Using EPSON StatusMonitor (Mac OS X)