|


|
 Memory card slot (enlarged figure)
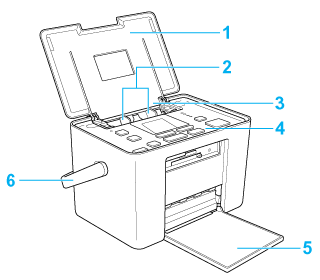
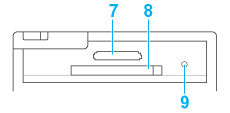 1. Top cover: Holds the blank paper straight. 2. Edge guides: Help load the paper straight. Adjust both edge guides to fit the width of your paper. 3. Paper feeder: Holds your paper and feeds it for printing. 4. Control panel: Controls various printer functions. See the next section for details. 5. Front cover: Receives the ejected paper. Open the cover to insert or eject the memory card. 6. Handle 7. xD-Picture Card/Memory Stick/Memory Stick PRO/SD/MultiMediaCard memory card slot: Use to load the xD-Picture Card, Memory Stick, Memory Stick PRO, Memory Stick Duo, Memory Stick PRO Duo, MagicGate Memory Stick, MagicGate Memory Stick Duo, SD, miniSD Card and MultiMediaCard. 8. CompactFlash Type II memory card slot: Use to load the CompactFlash or Microdrive. 9. Memory card light: On when a memory card is inserted into the memory card slot. Flashes when the printer is accessing the memory card.
 1. AC inlet 2. Photo cartridge lever 3. Photo cartridge 4. Cartridge compartment cover 5. USB port for computer: Used to connect the computer and printer together using the USB cable. 6. EXT. I/F (USB) port: Used to connect the optional Bluetooth Photo Print Adapter and digital cameras that have USB DIRECT-PRINT functionality, to the printer.
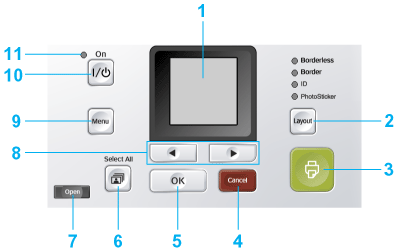 1. LCD screen: Displays the printer status messages, and the items and settings which can be changed with the buttons on the control panel. 2. Layout button: Press to change the layout. Select from the following.
3. 4. Cancel button: When a photo is displayed, pressing this button decreases the number of copies for that photo. When printing, pressing this button stops printing immediately and ejects the paper. 5. OK button: When a photo is displayed, pressing this button increases the number of copies for that photo. During setting, selects the item to be set on the LCD screen.
6. 7. Open button: Press to open the front cover.
8. 9. Menu button: Press to enter the Menu mode for the print settings or maintenance options.
10. 11. Power light: On when the printer is turned on and ready.
|
 Printer parts
 Top
Top Print button: Press to start printing with the settings made on the control panel.
 Select All button: Press to select all photos in the memory card.
 Photo/Option button: Press to turn to select and display the next or previous image. When in Menu mode, selects and displays the menus.
 On button: Press to turn the printer on and off.
