 |
|
|||
 |
||||
Scanner Software
 Note:
Note:|
A USB connection is necessary when scanning.
|
Operating System Versions
In this manual, the following abbreviations are used.
Windows refers to Microsoft Windows 7, Windows Vista, XP, Windows Server 2003, and Windows Server 2008
Windows 7 refers to Windows 7 Professional, Windows 7 Enterprise, and Windows 7 Ultimate.
Windows Vista refers to Windows Vista Business Edition, Windows Vista Enterprise Edition, and Windows Vista Ultimate Edition.
Windows XP refers to Windows XP Professional x86 Edition.
Windows Server 2003 refers to Windows Server 2003 Standard Edition and Windows Server 2003 Enterprise Edition.
Windows Server 2008 refers to Windows Server 2008 Standard Edition, Windows Server 2008 Enterprise Edition, Windows Server 2008 R2 Standard Edition, Windows Server 2008 R2 Enterprise Edition.

About Your Scanner Software
The scanner driver is software that allows your computer to control the scanner. You need to install the scanner driver so you can take full advantage of the scanner’s capabilities.
The scanner driver is compatible with TWAIN standard.
Note:|
Before proceeding, make sure you have installed the scanner driver on your computer.
|
Using the EPSON Scan for Business
EPSON Scan for Business is utility software that saves image data scanned from a scanner to a file. It is installed with the scanner driver. You can scan by starting EPSON Scan for Business without starting the application software (standalone mode). You can start EPSON Scan for Business from common TWAIN compatible applications, however, this section concentrates on standalone mode.
Note:|
The EPSON Scan for Business screen can be used as the UI mode when started as a TWAIN driver.
|
Starting EPSON Scan for Business
Follow these steps to access the EPSON Scan for Business from the Start menu:
 |
Click Start, click All Programs, click EPSON, click EPSON Scan for Business, and then select EPSON PLQ-22CS_CSM.
|
 |
Click EPSON Scan for Business icon.
|
Basic Scanning
Follow these steps to use basic scanning function of the EPSON Scan for Business:
|
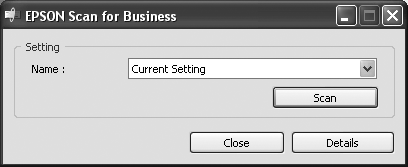
Start EPSON Scan for Business.
|
|
Load paper, check, or ID card to be scanned.
|
 |
Select a setting to be used from the drop down list.
|
 |
Click Scan.
|
Detailed Scanning Settings
The following tables show detailed settings for EPSON Scan for Business. Detailed setting screen will be displayed by pressing Details button.
Main menu
|
Settings
|
Explanations
|
|
Name
|
Select the setting saved in the detailed setting menu.
|
|
Save
|
Allows you to save the setting.
|
|
Delete
|
Allows you to delete the setting.
|
|
Displayed Side
|
Select the document side to be displayed in the preview.
|
|
Scan
|
Scan document.
|
|
Preview
|
Display a preview of the document. Changes in settings are immediately applied to the preview.
|
|
Eject
|
Eject document from the feeder.
|
General tab
|
Settings
|
Explanations
|
|
Scanning Side
|
Select document sides to be scanned.
|
|
Scanning Size
|
Select document size. Selecting Edit... allows you to add a custom size.
|
|
Image Type
|
Select image types from Color, Grayscale, and Black & White.
|
|
Image Type Option
|
Select image type options when Grayscale or Black & White are selected as the Image Type. Infrared is useful for removing background from MICR text.
|
|
Resolution
|
Select resolution setting.
|
|
File Size
|
Displays the expected uncompressed file size for the scanned image.
|
|
Brightness
|
Allows you to adjust the brightness for the scanned image. This setting is not available if Black & White is selected as the Image Type. This setting is not available when Text Enhancement is enabled.
|
|
Threshold
|
Allows you to adjust the threshold for the scanned image. This setting is only available when Black & White is selected as the Image Type. This setting is not available when Text Enhancement is enabled.
|
|
Auto Threshold
|
When scanning check images using the Black & White setting, it adapts to binarize the data by removing the background allowing the text to be read. This setting is particularly effective for check images.
|
|
Deskew
|
Select this option to automatically correct skew in the document.
|
|
90-deg. Rotation
|
Select this option to rotate the scanned image 90 degree clockwise for the face-down side and 90 degrees counter clockwise for the face-up side.
|
|
Text Enhancement
|
Enhances text from the document. Also, documents with a background can be scanned clearly by removing the background.
|
Crop tab
In this screen, you are able to crop scanned image by entering values in the table or directly select area from the preview.
Note:|
When specifying the scanning area, if an area larger than the paper size is specified, scanned data is not transferred and the paper is ejected. In this case, specify a different scanning area and scan again.
|
Recognition tab
|
Settings
|
Explanations
|
|
MICR*
|
Select this option to enable MICR data reading. You can change settings by pressing the Settings button. A preview of the MICR data is displayed in Recognition Results.
|
|
OCR
|
Select this option to enable OCR data reading. You can change settings by pressing the Settings button. You can specify the reading area by pressing Draw and selecting the area in the preview image. A preview of the OCR data is displayed in Recognition Results.
OCR reading is only possible for the face-down side. OCR reading is not available when Dropout: Red, Dropout: Green, Dropout: Blue, or Infrared is selected as the Image Type Option. |
|
Barcode
|
Selecting this option enables barcode reading. You can change settings by pressing the Settings button. The value of the barcode data is displayed in Recognition Results.
Barcode reading is not available when Dropout: Red, Dropout: Green, Dropout: Blue, or Infrared is selected as the Image Type Option. |
* This option is available for PLQ-22CSM only.
Endorsement tab
|
Settings
|
Explanations
|
|
Endorsement
|
Select this option to enable endorsement.
This setting is not available when ON is selected for 90-deg. Rotation. This setting is not available when Rear is selected for the Ejection Direction. |
|
Type
|
Select endorsement type. Electronic Endorsement prints on the scanned image and Print after scanning or Print before scanning prints on the original document.
|
|
Side
|
Select the document side to be endorsed.
This setting is not available when Print after scanning or Print before scanning is selected for Type. |
|
Position
|
Specify the endorsement position.
|
|
Font Size
|
Specify the font size used for the endorsement.
|
|
Direction
|
Select the print direction.
This setting is not available when Print after scanning or Print before scanning is selected for Type. |
|
Text
|
Enter the text to be endorsed.
|
Configuration tab
|
Settings
|
Explanations
|
|
Unit
|
Select the unit of measurement to be used.
|
|
Scanning Direction
|
Select the scan direction.
When Rear is selected for Ejection Direction, this setting is fixed at Front to Rear. |
|
Ejection Direction
|
Select the ejection direction of the document.
When the setting is changed to Rear, the paper is ejected immediately. When ejecting paper by pressing the Eject button, paper is ejected according to the direction specified in this setting. |
|
Duplex Scanning Order
|
Select the order of the sides to be scanned.
|
|
Auto Paper Ejection after Scanning
|
Select this option to eject paper automatically after scanning.
|
|
Display Scanned Image on the GUI*
|
Select this option to display a preview image of the scanned data.
|
|
Save Recognition Results*
|
Select this option to output the recognized result as a different file.
|
* These options are displayed in standalone mode only.
File tab*
|
Settings
|
Explanations
|
|
Location
|
Specify the location of the output data.
|
|
File Name
|
Specify a file name for the output data.
|
|
Start Number
|
Select a start number for the sequence of numbers to be added to the file name.
|
|
File Type
|
Select the file type for the output data. You can make detailed settings by pressing Option.
|
* This option is displayed in standalone mode only.
Using the Scanner via a Network
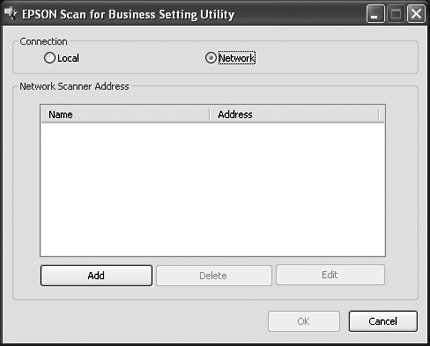
You can use the printer connected to a computer as a network scanner using the EPSON Scan for Business Setting Utility. Follow these steps to connect to the printer.
Note:|
Make sure the scanner driver is installed on both the printer server and the client computers.
The following steps provide the settings for the client computers.
You must access Windows as an Administrator.
|
|
Click Start, click All Programs, click EPSON, click EPSON Scan for Business, click EPSON PLQ-22CS_CSM, and then select EPSON Scan for Business Setting Utility.
|
|
Select Network and click Add.
|
|
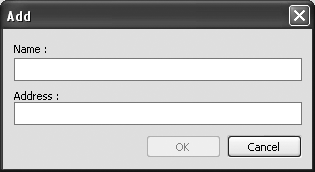
Enter the printer name and the network address for the computer to which the printer is connected, and then click OK.
|
Note:|
You can enter any name in the Name field. It’s a good idea to use a name which will help you to easily identify the printer, for example, “John’s office printer”.
|
 Note:
Note:|
When Windows Firewall is on in the printer server, add port number 2291 as an Exception.
|
Canceling Scanning
If you want to cancel scanning while a scan job is in progress, use the following procedure.
Press Cancel button in the scan progress dialog.
Note:|
If the computer enters standby status during scanning, the scan job is canceled.
|
Uninstalling the Scanner Software
When you wish to reinstall or upgrade the scanner driver, uninstall the scanner driver that has been installed already.
Uninstalling the scanner driver
|
Quit all applications.
|
|
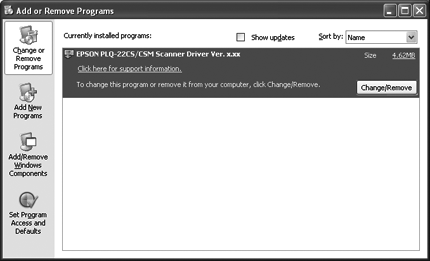
Click Start, and then select Control Panel.
|
|
Click Uninstall a program (Windows 7, Vista, or Server 2008) or double-click the Add or Remove Programs icon (Windows XP or Server 2003).
|

|
Click Change or Remove Programs, select the EPSON PLQ-22CS/CSM Scanner Driver Ver.x.xx, then click Uninstall/Change (Windows 7) or Change/Remove (Windows Vista, XP, Server 2003, or Server 2008).
|
 |
Follow the on-screen instructions.
|