|

Reference Guide
|
|
Options and Consumables
Installing an Interface Card
 Using the serial interface card
Follow the steps below to install an optional interface card.
 |
Note:
|
 |
Before installing the Ethernet interface card C82363 , you need to attach the optional interface adapter(C82525) to the interface card. , you need to attach the optional interface adapter(C82525) to the interface card.
|
|
 |
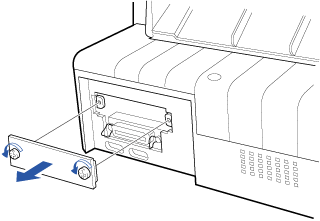
Make sure the printer is turned off. Unplug the printer's power cord and disconnect the interface cable.
|
 |
Remove the screws from the shield plate on the back of the printer and remove the plate.
|
 |
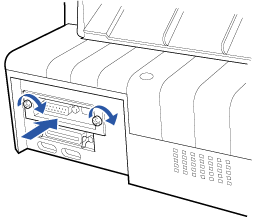
Slide the interface card along the slots on both sides of the interface compartment. Firmly push in the card to make sure the connector at the back of the interface card is fully inserted into the printer's internal socket. Then replace the screws and tighten them.
|
|
Note:
|
| |
Store the shield plate in a safe place; you will need to reattach it if you remove the interface card later.
|
|
To remove the interface card, reverse the steps above.
Using the serial interface card
To use the C82305 or C82306 serial interface card, see the sections below regarding the baud rate, handshake timing, and error handling. For all other data transfer conventions, such as word structure and communications protocol, see your interface card manual.
Selecting a baud rate
You can select from the following baud rates: 300, 600, 1200, 2400, 4800, 9600, and 19200 bps (bits per second). To set the baud rate, see the bit-rate selection table in your interface card manual.
Handshake timing
When the unused area for data in the input buffer drops to 256 bytes, the printer outputs an X-OFF code or sets the DTR flag to 1 (MARK) to indicate that it cannot receive data. When the unused area increases to 512 bytes, the printer outputs an X-ON code or sets the DTR flag to 0 (SPACE) to indicate that it is ready to receive data.
Error handling
When the printer detects a parity error, the print data is replaced with an asterisk (). The printer ignores all other errors, including framing and overrun errors.

[Top]
| Version 1.00E, Copyright © 2002, SEIKO EPSON CORPORATION |

