|

User's Guide
|
|
Paper Handling
Printing on Continuous Paper
 Printing with the push tractor
Removing a printed document from the push tractor
Switching back to single sheets
Printing with the pull tractor
Adjusting the top-of-form position
Advancing the paper to the tear-off edge
Your printer can handle continuous paper from 101.6 mm (4.0 inches) to 406.4 mm (16.0 inches) wide. Depending on where you position the tractor, you can use it as a pull tractor or a push tractor. The following guidelines can help you decide where to position the tractor:
-
Do you want to switch between printing on single sheets and continuous paper without removing the paper supply? Will you tear off continuous paper sheet-by-sheet? Use the tractor in the push tractor position. (The printer comes with the tractor installed in this position.) See the following section.
-
Are you printing on labels, multipart forms, or other documents that require a precise print position? Use the tractor as a pull tractor. See Printing with the pull tractor for instructions.
Printing with the push tractor
When using the push tractor, it is a good idea to set the Auto tear off feature in the Default Setting mode to On. See About Your Printer's Default Settings.
Follow these steps to load continuous paper using the push tractor:
 |
Make sure the printer is turned off. Remove the printer cover and the paper guide and place the paper release lever in the continuous paper position.
|
 |
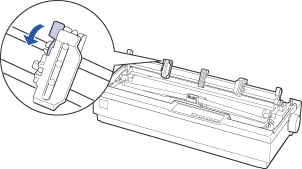
Release the sprocket units by pulling the sprocket locks forward.
|
 |
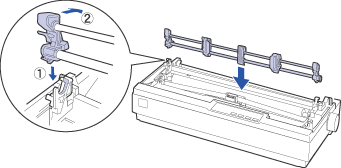
Slide the left sprocket unit using the scale on the printer as a guide. The printer prints to the right of the position marked 0. Push the sprocket lock lever back to lock it in place. Then slide the right sprocket unit to match the width of your paper, but do not lock it. Move the paper support so it is midway between the sprocket units.
|
 |
Make sure your paper has a clean, straight leading edge. Open the sprocket covers. Fit the first holes of the paper over the sprocket pins and then close the sprocket covers. Slide the right sprocket unit to remove any slack in the paper and lock it in place. Now the paper is in the paper-park position.
|
 |  |
Caution:
|
| | |
Use the paper feed knob on the right side of the printer only to clear paper jams and only when the printer is turned off. Otherwise, you may damage the printer or cause it to lose the top-of-form position.
|
|
 |
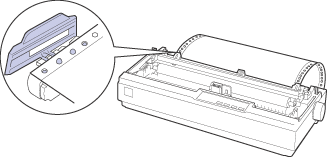
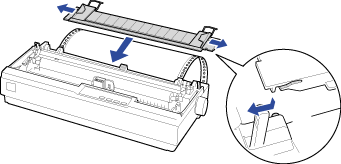
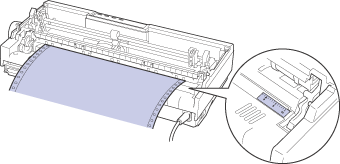
To separate the incoming paper from the printed paper, attach the paper guide by holding it horizontally and fitting its notches over the printer's mounting posts as shown below. Then slide the paper guide toward the front of the printer until you feel it click and adjust the edge guides to the width of the paper.
|
 |
Turn on the printer.
|
 |
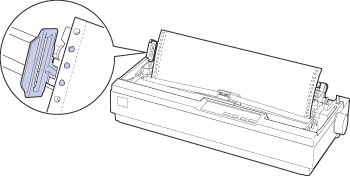
Make sure the printer cover is closed. Press the LF/FF button to feed the paper to the loading position. When the printer receives data, it begins printing automatically.
|
 |
After you finish printing, follow the steps in the next section to tear off your printed document. If the first printed line on your page appears too high or low, you can change its position by using the Micro Adjust feature. See Adjusting the top-of-form position.
|
|
Caution:
|
| |
Never use the paper feed knob to adjust the top-of-form position; this may damage the printer or cause it to lose the top-of-form position.
|
|
When you send more data, the paper automatically feeds back to the loading position.

[Top]
Removing a printed document from the push tractor
Follow these steps to remove the printed document:
|
|
Make sure the Tear Off (Pitch/Font) lights are flashing.
|
|  |
Note:
|
| | |
If they are not flashing, you may need to set the Tear Off setting on as a default. See Changing default settings to change the default setting.
|
|
|
|
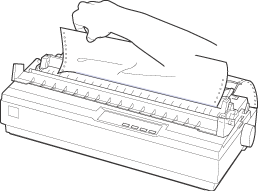
Open the paper guide cover, then tear off the printed document using the tear-off edge of the paper tension unit.
|
| |
Note:
|
| | |
If your paper's perforation is not properly aligned with the tear-off edge, you can adjust the tear-off position using the Micro Adjust feature. See Adjusting the tear-off position.
|
|
| |
Caution:
|
| | |
Never use the paper feed knob to adjust the tear-off position; this may damage the printer or cause it to lose the tear-off position.
|
|
|
|
Close the paper guide cover.
|
When you resume printing, the printer automatically feeds the paper back to the top-of-form position and starts printing.
To feed continuous paper to the standby position where you can remove the paper, press the Load/Eject button. Then open the sprocket covers of the tractor and remove the paper.
|
Caution:
|
| |
Always tear off your printed document before you press the Load/Eject button. Reverse feeding several pages at a time may cause a paper jam.
|
|
[Top]
Switching back to single sheets
To switch to single sheets, press the Load/Eject button; the printer feeds the paper backwards into the standby position. Then, follow the steps in Loading single sheets.
|
Caution:
|
| |
Always tear off your printed document before you press the Load/Eject button. Reverse feeding several pages at a time may cause a paper jam.
|
|
[Top]
Printing with the pull tractor
To load continuous paper using the pull tractor, you must move the tractor to the pull tractor position, as described in steps 1 through 3 in this procedure. If your tractor is already installed in this position, make sure the printer is turned off and skip to step 6.
|
Caution:
|
| -
Use the paper feed knob on the right side of the printer only to clear paper jams and only when the printer is off. Otherwise, you may damage the printer or cause it to lose the top-of-form position.
|
|
| -
When using the pull tractor, set the Auto tear off feature in the Default Setting mode to Off; otherwise, the paper may jam.
|
|
|
|
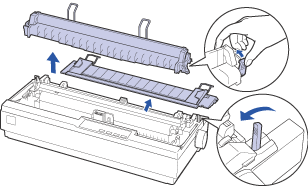
Turn the printer off; then remove the printer cover and the paper guide. Next, remove the paper tension unit by squeezing the paper tension unit's lock tabs gently and pulling the paper tension unit away from the printer. Finally, pull the paper release lever forward to the continuous paper position.
|
|
|
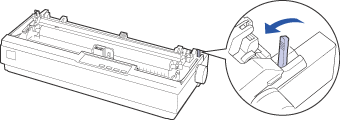
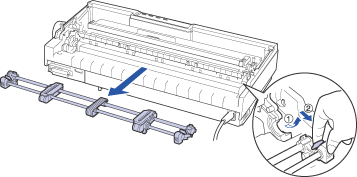
Squeeze the tractor's lock tabs gently on both sides, and then rotate the tractor up to pull it away from the printer.
|
|
|
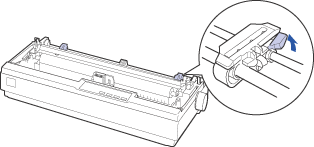
Move the tractor forward to the mounting slot at the top of the printer and tilt it into place as shown below. When you push the tractor onto the posts, you should feel the notches snap into place.
|
|
|
Release the sprocket units by pulling the sprocket locks forward.
|
|
|
Insert the paper into the bottom paper slot or into the rear paper slot as shown below, and pull it up. Position the paper using the scale on the printer as a guide. The printer prints to the right of the position marked 0.
|
|
|
Slide the left sprocket unit so that its sprockets match the position of the holes in the paper and lock the unit in place. Then slide the right sprocket unit to match the width of your paper, but do not lock it. Move the paper support midway between the two sprocket units.
|

|
|
Make sure your paper has a clean, straight leading edge. Open the sprocket covers. Fit the first holes of the paper over the sprocket pins and then close the sprocket covers. Slide the right sprocket unit to remove any slack in the paper and then lock it in place.
|
| |
Note:
|
| | |
Remove any remaining slack by gently pulling the paper from the rear or bottom.
|
|
|
|
To separate the incoming paper from the printed paper, attach the paper guide. Hold it horizontally and fit its notches over the printer's mounting posts. Then slide the paper guide toward the back of the printer until you feel it click and adjust the edge guides to the width of the paper.
|
 |
Attach the printer cover and adjust the paper position with the paper feed knob. Turn the knob until the perforation between pages is just above the print head. Then turn on the printer.
|
 |
Make sure the printer cover is closed, but with the paper guide cover open. When the printer receives data, it begins printing automatically.
|
If you want to change the position where printing begins on the page, press LF/FF to advance the page to the next top-of-form position, and then see Adjusting the top-of-form position in the next section to adjust the loading position.
To eject the paper, tear off the paper entering the printer; then press the LF/FF button to feed the paper forward.
[Top]
Adjusting the top-of-form position
The top-of-form position is the position on the page where the printer starts printing. If your printing appears too high or low on the page, you can use the micro adjust feature to adjust the top-of-form position. Follow these steps:
|
Caution:
|
| |
Never use the paper feed knob to adjust the top-of-form position; this may damage the printer or cause it to lose the top-of-form position.
|
|
|
Note:
|
| -
Your top-of-form position setting remains in effect until you change it, even if you turn off the printer.
|
|
| -
The top margin setting made in some application software overrides the top-of-form position setting you make with the Micro Adjust feature. If necessary, adjust the top-of-form position in your software.
|
|
|
|
Make sure the printer is turned on.
|
|
|
If necessary, load paper as described in this chapter.
|
|
|
Remove the printer cover.
|
|
|
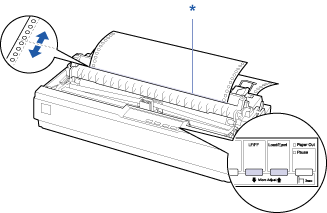
Hold down the Pause button for about three seconds. The Pause light starts flashing and the printer enters the Micro Adjust mode.
|
|
|
Press the LF/FF  button to move the top-of-form position up on the page, or press the Load/Eject button to move the top-of-form position up on the page, or press the Load/Eject  button to move the top-of-form position down on the page. button to move the top-of-form position down on the page.
|
* plastic ribbon cover
| |
Note:
|
| | -
The printer has a minimum and a maximum top-of-form position. If you try to adjust it beyond these limits, the printer beeps and stops moving the paper.
|
|
| | -
When the paper reaches the default top-of-form position, the printer also beeps and stops moving the paper briefly. You can use the default position as a reference point when adjusting the top-of-form position.
|
|
To adjust the top-of-form position for continuous paper loaded on the pull tractor, see the following example:
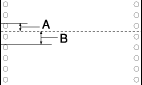
First mark a point 5.5 mm (0.22 inch) above the paper's perforation; then position the paper so that the mark is even with the top edge of the plastic ribbon cover. This gives you an 8.5 mm (0.33 inch) margin on the next page, meaning the printer starts printing 8.5 mm (0.33 inch) below the perforation. If you mark a point 5.5 mm (0.22 inch) above the perforation, you get a 8.5 mm (0.33 inch) margin on the next page.
|
A
|
5.5 mm (0.22 inch)
|
|
B
|
8.5 mm (0.33 inch)
|
|
|
After you set the top-of-form position, press the Pause button to exit the Micro Adjust mode.
|
[Top]
Advancing the paper to the tear-off edge
If you use the push tractor, you can use the tear-off feature to advance your continuous paper to the printer's tear-off edge when you finish printing. You can then easily tear off the printed document. When you resume printing, the printer automatically feeds the paper back to the top-of-form position so that you can save the paper normally lost between documents.
As described below, you can use the tear-off feature by turning on the auto tear-off mode.
|
Caution:
|
| |
Never use the tear-off feature (as described below) to feed continuous paper with labels backwards; they may come off their backing sheet and jam the printer.
|
|
Advancing the paper to the tear-off position automatically
To automatically advance your printed documents to the tear-off position, you need to turn on the auto tear-off mode and select the appropriate page length for continuous paper in the Default Setting mode. For instructions, see Changing default settings.
When auto tear-off is on, the printer automatically advances the paper to the tear-off position whenever it receives a full page of data or a form feed command followed by no more data.
Adjusting the tear-off position
If your paper's perforation is not aligned with the tear-off edge, you can use the Micro Adjust feature to move the perforation to the tear-off position.
Follow these steps to adjust the tear-off position:
|
Caution:
|
| |
Never use the paper feed knob to adjust the tear-off position; this may damage the printer or cause it to lose the tear-off position.
|
|
|
Note:
|
| |
Your tear-off position setting remains in effect until you change it, even if you turn off the printer.
|
|
|
|
Make sure the Tear Off (Pitch/Font) lights are flashing (the paper is at the current tear-off position). You may need to press the Pitch (Font) button to advance the paper to the tear-off position.
|
|
|
Open the paper guide cover.
|
|
|
Hold down the Pause button for about three seconds. The Pause light begins to flash and the printer enters the Micro Adjust mode.
|
|
|
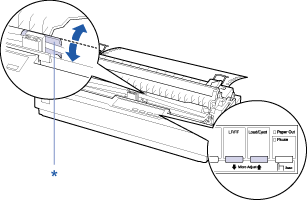
Press the LF/FF button to feed the paper backwards, or press the Load/Eject button to feed the paper forwards, until the paper perforation is aligned with the tear-off edge.
|
* tear-off edge
| |
Note:
|
| | |
The printer has a minimum and a maximum tear-off position. If you try to adjust the tear-off position beyond these limits, the printer beeps and stops moving the paper.
|
|
|
|
After you set the tear-off position, press the Pause button to exit the Micro Adjust mode.
|
|
|
Tear off the printed pages.
|
When you resume printing, the printer automatically feeds the paper back to the top-of-form position and begins printing.
[Top]
| Version BPS0033-00, Copyright © 2008, SEIKO EPSON CORPORATION |
