![]()
Network Guide
|
|
Index |
|
Search | |||||||
|
|
Contents |
|
Help | |||||||
|
|
|
|||||||||||||||||||||||||||||||||
How To / How to Set Up the Print Server
This section explains how to use EpsonNet WinAssist to configure the print server.
| Note: |
|
|
|
|
 |
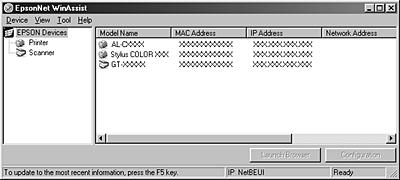
Click Start, point to Programs or All Programs (Windows XP), and then select EpsonNet WinAssist V4. Click EpsonNet WinAssist to start it. |
 | Select the printer you want to configure, and then click Configuration or double-click the printer icon. |
| Note: |
|
|
|
|
 | Click the TCP/IP tab. |
| Note: |
|
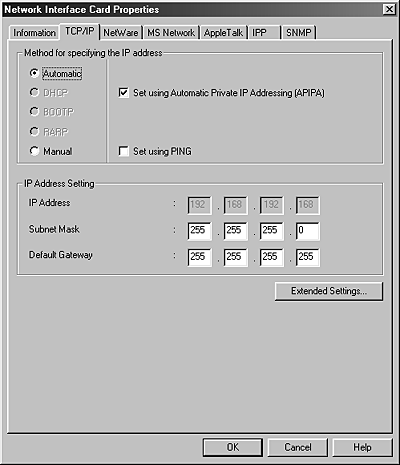
 | Select a method for specifying the IP address. If you select Automatic, DHCP becomes available and assigns an IP address automatically. If you want to set the IP address manually, select Manual instead. |
| Note: |
|
|
|
 | If you want to get a private address between 169.254.1.1 and 169.254.254.254 automatically when an IP address cannot be obtained by the DHCP server, leave the Set using Automatic Private IP Addressing (APIPA) check box selected; otherwise, clear the check box. |
 | When setting an IP address using the ping command, select the Set using PING check box. Do not select it when setting an IP address with EpsonNet WinAssist/MacAssist/WebAssist; this prevents any unexpected changes of the IP address. |
| Note: |
|
 | To assign an IP address manually, enter the IP address, the subnet mask, and the default gateway. Be sure the IP address does not conflict with any other devices on the network. |
| Note: |
|
 | Click the Extended Settings button if you want to make extended settings, such as Dynamic DNS and Universal Plug and Play functions. |
| Note: |
|
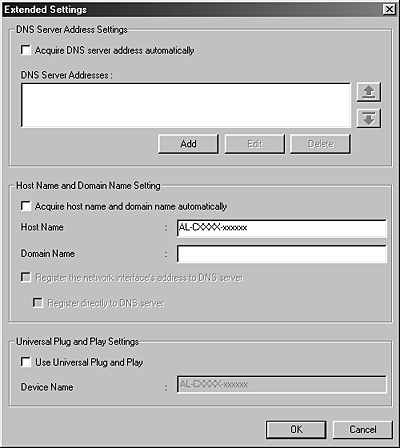
 | Select the Acquire DNS server address automatically check box if you want to acquire the DNS server address using the DHCP server. |
If you want to enter the DNS server address manually, click the Add button and then enter the IP address of the DNS server. Click OK.
 | Select the Acquire host name and domain name automatically check box if you want to acquire the host name and the domain name using the DHCP server. |
If you want to specify manually, enter the host name and the domain name in the text boxes.
 | Select the Register the network interface's address to DNS server check box if you want to register the host name and domain name to the DNS server through the DHCP server that supports Dynamic DNS. |
If you want to register the host name and the domain name directly to the DNS server, select the Register directly to DNS server check box.
 | Select the Use Universal Plug and Play check box if you want to use the Universal Plug and Play function on Windows Me or future operating systems. |
Change the default Universal Plug and Play device name, if desired. This device name is used for Windows that supports the Universal Plug and Play function.
 | After changing the settings, click OK. |
 | In the TCP/IP dialog box, click OK. The Password dialog box appears. |
 | Enter your password (up to 20 characters) and then click OK to save the settings. If you are entering a password for the first time, click Change and then set the password. See About Password for more information. |
Follow the on-screen instructions. After the update is complete, refresh the configuration by selecting Refresh from the View menu.
| Caution: |
|
 Previous |
 Next |
| Version NPD0133-03, Copyright © 2003, SEIKO EPSON CORPORATION |