 |
Making Changes to Printer Settings
 Making the print quality settings Making the print quality settings
Resizing printouts
Modifying the print layout
Using a watermark
Using headers and footers
Duplex printing
Making Extended Settings
Printing a status sheet
Making the print quality settings
You can change the print quality of printouts through settings in the printer driver. With the printer driver, you can make the print settings by choosing from a list of predefined settings, or customizing the settings.
Choosing the print quality by using the Automatic setting
You can change the print quality of printouts to favor speed or detail. There are three levels of print output, Fast, Fine, and Super Fine. Fine and Super Fine provide high quality, precise printing, but requires more memory and slows the printing speed.
When Automatic is selected on the Basic Settings tab, the printer driver takes care of all detailed settings according to the color setting you select. Color and resolution are the only settings you need to make. You can change other settings such as paper size or orientation in most applications.
For Mac OS X users
 |
Open the Print dialog box.
|
 |
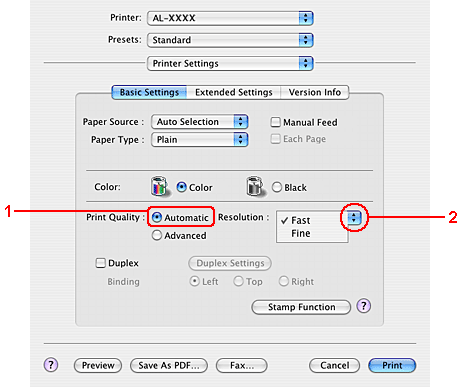
Select Printer Settings from the drop-down list, and select the Basic Settings tab.
|
 |
Click Automatic, then choose the resolution from the Resolution drop-down list.
|
For Mac OS 9 users
|
|
Open the Basic Settings dialog box.
|
|
|
Click Automatic on Print Quality, then choose desired printing resolution with the slider bar.
|
|  |
Note: |
| |
|
If printing is unsuccessful or a memory-related error message appears, selecting a lower resolution may allow printing to proceed.
|
|
Using the predefined settings
The predefined settings are provided to help you optimize print settings for a particular kind of printout, such as presentation documents or images taken by a video or digital camera.
Follow the steps below to use the predefined settings.
For Mac OS X users
|
|
Open the Print dialog box.
|
|
|
Select Printer Settings from the drop-down list, and select the Basic Settings tab.
|
|
|
Select Advanced. You will find the predefined settings in the list on the right of Automatic.
|

 |
Select the most appropriate setting from the list according to the type of document or image you want to print.
|
For Mac OS 9 users
|
|
Open the Basic Settings dialog box.
|
|
|
Select Advanced. You will find the predefined settings in the list on the right of Automatic.
|
|
|
Select the most appropriate setting from the list according to the type of document or image you want to print.
|
When you choose a predefined setting, other settings such as Printing Mode, Resolution, Screen, and Color Management are set automatically. Changes are shown in the Summary drop-down list in the Print dialog box (for Mac OS X), or in the current settings list on the left of the Basic Settings dialog box (for Mac OS 9).
|
Note: |
|
|
The printer driver’s online help provides details on printer driver settings.
|
|
Customizing print settings
Your printer provides for customized print settings if you need more control over the printout, want to make the most detailed settings available, or just want to experiment.
Follow the steps below to customize your print settings.
For Mac OS X users
|
|
Open the Print dialog box.
|
|
|
Select Printer Settings from the drop-down list, and select Basic Settings tab.
|
|
|
Click Advanced, then click More Settings. The following dialog box appears.
|

|
|
Choose Color or Black as the Color setting.
|
 |
Choose the desired printing resolution from the drop-down list.
|
| |
Note: |
 |
Click OK to apply the settings and return to the Basic Settings dialog box.
|
| |
Note: |
| |
|
For details on each setting, see the online help.
|
|
For Mac OS 9 users
|
|
Open the Basic Settings dialog box.
|
|
|
Click Advanced, then click More Settings. The following dialog box appears.
|

|
|
Choose Color or Black as the Color setting.
|
|
|
Choose the desired printing resolution with the slider bar.
|
| |
Note: |
|
|
Click OK to apply the settings and return to the Basic Settings dialog box.
|
| |
Note: |
| |
|
For details on each setting, see the online help.
|
|
For Mac OS X users
Use the following procedures to save your custom settings.
Save your custom settings by Save or Save As in the Preset on the Print dialog box. Type a name for your custom settings in the name box. Your settings will be saved with this name in the Preset drop-down list.
|
Note: |
|
|
The Custom Setting option is a standard feature of Mac OS X.
|
|
For Mac OS 9 users
To save your custom settings, select Advanced, then click Save Settings on the Basic Settings dialog box. The Custom Settings dialog box appears.
Type a name for your custom settings in the Name box, click Save. Your settings will appear in the list on the right of Automatic in the Basic Settings dialog box.
|
Note: |
|
-
To delete a custom setting, select Advanced, click Save Settings on the Basic Settings dialog box, select the setting in the User Settings dialog box, then click Delete.
|
|
If you change any setting in the Advanced Settings dialog box when one of your custom settings is selected in the Advanced Settings list on the Basic Settings dialog box, the setting selected in the list changes to User Settings. The custom setting that was previously selected is not affected by this change. To return to your custom setting, simply reselect it from the current settings list.
You can enlarge or reduce the size of your documents during printing according to the specified paper size.
For Mac OS X users
|
Note: |
|
|
This function is not available with Mac OS X 10.2 and 10.3.
|
|
|
|
Open the Print dialog box.
|
|
|
Select Paper Handling from the drop-down list.
|
|
|
Select Scale to fit paper size and select the desired paper size from the drop-down list.
|

| |
Note: |
For Mac OS 9 users
|
Note: |
|
|
The enlarging or reducing rate is automatically specified according to the paper size selected in the Paper Setting dialog box.
|
|
|
|
Click the  Layout icon on the Basic Settings dialog box. The Layout dialog box appears. Layout icon on the Basic Settings dialog box. The Layout dialog box appears.
|
|
|
Select the Fit to Page check box, then select the desired paper size from the Output Paper drop-down list. The page will be printed to fit on the paper you have selected.
|

|
|
Click OK to apply the settings.
|
Modifying the print layout
You can print either two or four pages onto a single page and to specify the printing order, automatically resizing each page to fit the specified paper size by using Layout printing. You can also choose to print documents surrounded by a frame.
For Mac OS X users
|
|
Open the Print dialog box.
|
|
|
Select Layout from the drop-down list.
|
|
|
Select the number of pages you want to print on one sheet of paper from the drop-down list.
|

|
|
Click Print to start printing.
|
| |
Note: |
| |
|
The Layout settings are a standard feature of Mac OS X.
|
|
For Mac OS 9 users
|
|
Click the Layout icon on the Basic Settings dialog box. The Layout dialog box appears.
|
|
|
Select the Print Layout check box, then click Print Layout Settings. The Print Layout Setting dialog box appears.
|

|
|
Select the number of pages you want to print on one sheet of paper.
|

|
|
Select the page order in which the pages are printed on each sheet.
|
| |
Note: |
| |
|
Page Order choices depend on Pages selected above, and Orientation.
|
|
|
|
Click OK to apply the settings and return to the Layout dialog box.
|
|
|
Select the Print the Frame check box on the Layout dialog box when you want to print the pages surrounded by a frame.
|
 |
Click OK to apply the settings.
|
Follow the steps below to use a watermark on your document. In the Layout dialog box, you can select from a list of predefined watermarks, or you can select a bitmap (PICT) file or text file as your own custom watermark. The Layout dialog box also allows you to make a variety of detailed watermark settings. For example, you can select the size, intensity, and position of your watermark.
For Mac OS X users
|
|
Open the Print dialog box.
|
|
|
Select Printer Settings from the drop-down list, and select the Basic Settings tab.
|
|
|
Click Stamp Function.
|

|
|
Select the Watermark check box, then click Watermark Settings.
|

|
|
Select a watermark from the Watermark drop-down list.
|

|
|
Select the location on the page where you want to print the watermark by dragging the watermark image on the preview window. To resize the watermark, drag its handle.
|
|
|
Adjust the image density of the watermark with the Intensity slide bar.
|
 |
You can rotate custom text watermarks by inputting the degrees in the Angle box. Or select the Rotate by mouse check box, then rotate the text watermark with the pointer on the preview window.
|
 |
Click OK to apply the settings.
|
For Mac OS 9 users
|
|
Click the Layout icon on the Basic Settings dialog box. The Layout dialog box appears.
|
|
|
Select the Watermark Settings check box, then select a watermark from the Watermark drop-down list.
|

|
|
Select the location on the page where you want to print the watermark by dragging the watermark image on the preview window. To resize the watermark, drag its handle.
|
|
|
Adjust the image intensity of the watermark with the Intensity slider bar.
|
|
|
You can rotate custom text watermarks by inputting the degrees in the Angle box. Or select the Rotate by mouse check box, then rotate the text watermark with the pointer on the preview window.
|
|
|
Click OK to apply the settings.
|
You can make a new text or bitmap watermark with the following procedures.
For Mac OS X users
|
|
Open the Print dialog box.
|
|
|
Select Printer Settings from the drop-down list, and select the Basic Settings tab.
|
|
|
Click Stamp Function.
|

|
|
Select the Watermark check box, then click Watermark Settings.
|

|
|
Click New/Delete.
|

|
|
Click Add Text on the User Stamp Setting dialog box.
|

|
|
Click the Text box to open the Text Input dialog box. Type the watermark text, then click OK to close the dialog box. Select the Font and Style, then click OK on the Edit Text dialog box.
|

|
|
Type the file name in the Watermark box, then click Save.
|

| |
Note: |
| |
-
To edit the saved text watermark, select it from the List box, then click Edit Text. After editing, be sure to click OK to close the dialog box.
-
To remove the saved text watermark, select it from the List box, then click Mark Delete. After removing it, be sure to click Save to close the dialog box.
|
|
|
|
Select a custom watermark, that has been saved, from the Watermark drop-down list on the Watermark Setting dialog box, and then click OK.
|
For Mac OS 9 users
|
|
Click the Layout icon on the Basic Settings dialog box. The Layout dialog box appears.
|
|
|
Select the Watermark Settings check box, then click New/Delete. The Custom Watermark dialog box appears.
|

|
|
Click Add Text on the Custom Watermark dialog box.
|

|
|
Type the watermark text in the Text box, select the Font and Style, then click OK on the Text Watermark dialog box.
|

|
|
Type the file name in the Name box, then click Save.
|

| |
Note: |
| |
-
To edit the saved text watermark, select it from the List box, then click Edit Text. After editing, be sure to click OK to close the dialog box.
-
To remove the saved text watermark, select it from the List box, then click Delete. After removing it, be sure to click Save to close the dialog box.
|
|
|
|
Select a custom watermark, that has been saved, from the Watermark drop-down list on the Watermark Setting dialog box, and then click OK.
|
To make a bitmap watermark
Before making a custom watermark, you should prepare a bitmap (PICT) file.
For Mac OS X users
|
|
Open the Print dialog box.
|
|
|
Select Printer Settings from the drop-down list, and select the Basic Settings tab.
|
|
|
Click Stamp Function.
|

|
|
Select the Watermark check box, then click Watermark Settings.
|

|
|
Click New/Delete.
|

|
|
Click Add PICT on the User Stamp Setting dialog box.
|

|
|
Select the PICT file, then click Open.
|

|
|
Type the file name in the Watermark box, then click Save.
|

| |
Note: |
| |
|
To remove the saved text watermark, select it from the List box, then click Mark Delete. After removing it, be sure to click Save to close the dialog box.
|
|
|
|
Select the saved custom watermark from the Watermark drop-down list on the Watermark Setting dialog box, then click OK.
|
For Mac OS 9 users
|
|
Click the Layout icon on the Basic Settings dialog box. The Layout dialog box appears.
|
|
|
Select the Watermark Settings check box, then click New/Delete. The Custom Watermark dialog box appears.
|

|
|
Click Add PICT on the Custom watermark dialog box.
|

|
|
Select the PICT file, then click Open.
|

|
|
Type the file name in the Name box, then click Save.
|

| |
Note: |
| |
|
To remove the saved watermark, select it from the List box, then click Delete. After removing it, be sure to click Save to close the dialog box.
|
|
|
|
Select the saved custom watermark from the Watermark drop-down list on the Layout dialog box, then click OK.
|
Using headers and footers
You can print a header or footer on the top or bottom of a page. The items that can be printed as a header or footer include user name, computer name, date, date/time, or collate number.
For Mac OS X users
|
|
Open the Print dialog box.
|
|
|
Select Printer Settings from the drop-down list, and select Basic Settings tab.
|
|
|
Click Stamp Function.
|

|
|
Select the Header/Footer check box, then click Header/Footer Settings.
|

|
|
Select the items to be printed for the header and the footer from the drop-down list.
|

| |
Note: |
| |
|
If you select Collate Number from the drop-down list, the number of copies is printed.
|
|
|
|
Click OK to apply the settings.
|
For Mac OS 9 users
|
|
Click the Layout icon on the Basic Settings dialog box. The Layout dialog box appears.
|
|
|
Select the Header/Footer check box, then click Header/Footer Settings.
|

|
|
Select the items to be printed for the header and the footer from the drop-down list.
|

| |
Note: |
| |
|
If you select Collate Number from the drop-down list, the number of copies is printed.
|
|
|
|
Click OK to apply the settings and return to the Layout dialog box.
|
Duplex printing prints on both sides of the paper. You can also do duplex printing manually without using the Duplex Unit. When printing for binding, the binding edge can be specified as required to produce the desired page order.
Printing with the Duplex Unit (models with Duplex Unit only)
Follow the steps below to print with the Duplex Unit.
For Mac OS X users
|
|
Open the Print dialog box.
|
|
|
Select Printer Settings from the drop-down list, and select Basic Settings tab.
|
|
|
Click Duplex check box, select a Binding position from Left, Top, or Right.
|
|
|
Click the Duplex Settings button.
|
|
|
Specify the Binding Margin for the front and back sides of the paper.
|

|
|
Select whether the front or back side of the paper is to be printed as the Start Page.
|
|
|
Click Print to start printing.
|
For Mac OS 9 users
|
|
Click the Layout icon on the Basic Settings dialog box. The Layout dialog box appears.
|
|
|
Select the Duplex check box.
|
|
|
Select a Binding position from Left, Top, or Right.
|
|
|
Click Duplex Settings to open the Duplex Settings dialog box.
|
|
|
Specify the Binding Margin for the front and back sides of the paper.
|

|
|
Select whether the front or back side of the paper is to be printed as the Start Page.
|
|
|
Click OK to apply the settings and return to the Layout dialog box.
|
Doing duplex printing manually (models without Duplex Unit only)
For Mac OS X users
|
|
Open the Print dialog box.
|
|
|
Select Printer Settings from the drop-down list, and select the Basic settings tab.
|
|
|
Select the Duplex (Manual) check box, then click Duplex Settings.
|
|
|
Select a Binding position from Left, Top, or Right.
|
|
|
Specify the Binding Margin for the front and back sides of the paper.
|

|
|
Select whether the front or back side of the paper is to be printed as the Start Page.
|
|
|
Click Print to start printing.
|
|
|
After printing on one side, reload the paper into the MP tray with the printed surface face-up as shown below. Then press the  Start/Stop button. Start/Stop button.
|

| |
Note: |
| |
|
Straighten the paper before loading it. If curled paper is loaded, it may not feed correctly.
|
|
For Mac OS 9 users
|
|
Click the Layout icon on the Basic Settings dialog box. The Layout dialog box appears.
|
|
|
Select the Duplex (Manual) check box, then click Duplex Settings.
|
|
|
Select a Binding position from Left, Top, or Right.
|
|
|
Click Duplex Settings to open the Duplex Settings dialog box.
|
|
|
Specify the Binding Margin for the front and back sides of the paper.
|

|
|
Select whether the front or back side of the paper is to be printed as the Start Page.
|
|
|
Click OK to apply the settings and return to the Layout dialog box.
|
|
|
Click Print to start printing.
|
|
|
After printing on one side, reload the paper into the MP tray with the printed surface face-up as shown below. Then press the Start/Stop button.
|

| |
Note: |
| |
|
Straighten the paper before loading it. If curled paper is loaded, it may not feed correctly.
|
|
You can make various settings in the Extended Settings dialog box, for example Page Protect.
For Mac OS X users, open the Print dialog box and select Printer Settings from the drop-down list, then select the Extended Settings tab.
For Mac OS 9 users, click the  Extended Settings icon on the Basic Settings dialog box. Extended Settings icon on the Basic Settings dialog box.
|
Note: |
|
|
The printer driver’s online help provides details on printer driver settings.
|
|
To confirm the current status of the printer, print a status sheet from the printer driver. The status sheet contains information about the printer, the current settings.
Follow the steps below to print a status sheet.
|
|
Select Chooser from the Apple menu. Click the icon of your printer, and then select the USB port that your printer is connected to. Click Setup, and the EPSON Printer Setup dialog box appears.
|
|
|
Click Print Status, and the printer starts printing a status sheet.
|
|
Note: |
|
|
This function is not available with Mac OS X. For Mac OS X users, print a status sheet from the control panel. See Printing a Status Sheet for instructions.
|
|
| |


 button for details on each setting.
 Top
Top