|

Reference Guide
|
|
How to / Replacing Consumable Products
Transfer Belt Unit
Prepare a new transfer belt unit for replacement when you get a message informing you to do so.
Handling precautions
Always pay attention to the following handling precautions before replacing the transfer belt unit:
-
Make sure you hold the transfer belt unit by its handle. Do not touch the belt area.
-
Keep the transfer belt unit out of the reach of children.
Replacing the transfer belt unit
Follow these steps to replace the transfer belt unit:
 |
Turn off the printer.
|
 |
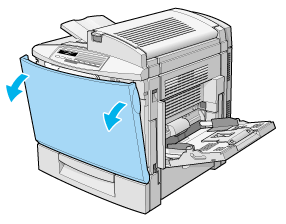
Open the front cover.
|
 |
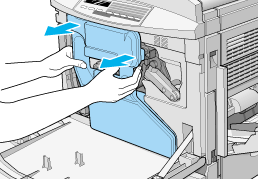
Detach the waste toner collector.
|
 |  |
Note:
|
 |  | -
Be careful not to spill toner when handling the waste toner collector.
|
 |  | -
Place the waste toner collector in a safe place during the replacement procedure.
|
 |
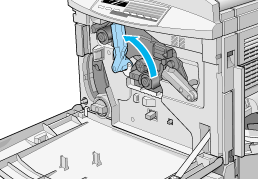
Turn the large lever counterclockwise to an upright position.
|
 |
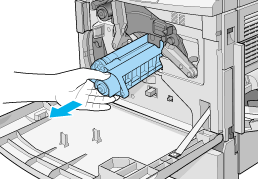
Pull the photoconductor unit out of the printer.
|
 |  |
Note:
|
 |  |
Keep the photoconductor unit in a safe place during the replacement procedure. Be sure not to touch the green drum.
|
 |
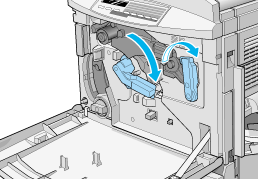
Turn both the large lever and right lever clockwise until they are in the positions shown in the illustration.
|
 |
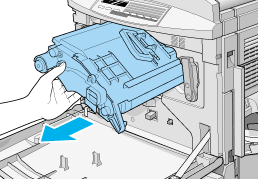
Gently pull the transfer belt unit out about 20 cm and the handle will spring up.
|
 |
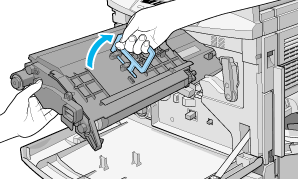
Hold the transfer belt unit by the handle and slowly pull the whole unit out of the printer while tilting the unit slightly downward.
|
 |
Remove the new transfer belt unit from its package.
|
 |  |
Note:
|
 |  |
All new transfer belt units have a tension release rod with a yellow ring handle inserted into the unit. Do not pull it out yet.
|
 |
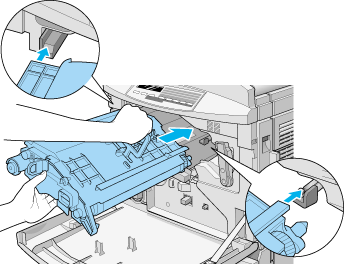
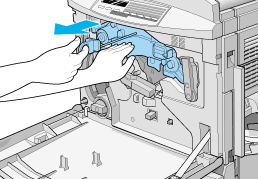
Holding the new transfer belt unit by the handle, insert it into the slot making sure that the sides on the top sit on the guide rails as you push it all the way in.
|
 |
While keeping the transfer belt unit in place with your left hand, pull the ring toward you to remove the tension release rod.
|
 |  |
Note:
|
 |  |
The tension release rod is used to prevent damage to the belt during transportation and when the printer is not being used for long periods. Make sure you keep the rod in a safe place so you can reinsert it when you need to transport the printer.
|
 |
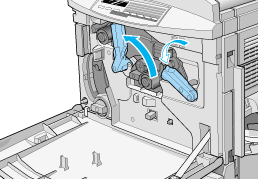
Turn both the large lever and the right lever counterclockwise until they are in the positions shown in the illustration.
|
 |
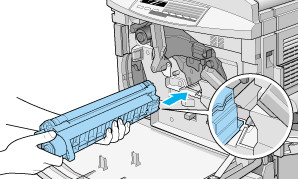
Reinstall the photoconductor unit, making sure that the bottom of the unit slide into the guide rails.
|
 |  |
Caution:
|
 |  |
Make sure the photoconductor unit is inserted correctly. Otherwise, it may damage the printer.
|
 |  |
Note:
|
 |  |
Be sure the unit is completely inserted into the slot. Otherwise, the large lever cannot be restored to a position that accommodates the waste toner collector.
|
 |
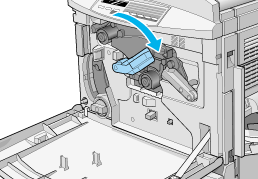
Turn the large lever clockwise, until the lever rests on the photoconductor unit as shown below.
|
 |
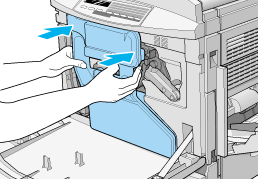
Reattach the waste toner collector, making sure not to spill toner.
|
 |
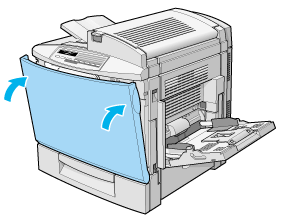
Close the front cover.
|

[Top]
| Version 1.00E, Copyright © 2001, SEIKO EPSON CORPORATION |