|

Reference Guide
|
|
How to / Replacing Consumable Products
Fuser Kit
The fuser kit consists of the following items:
These items are sold as a kit because they need replacement at the same time.
Fuser unit
Prepare a new fuser unit for replacement when the you see a message informing you of to do so.
Handling precautions
Always pay attention to the following handling precautions before replacing the fuser unit:
-
Keep the fuser unit out of the reach of children.
 |
Warning:
|
 |
The fuser unit can be very hot if the printer has been in use. Turn the printer's power off and wait till the temperature has subsided before changing the fuser unit.
|
Replacing the fuser unit
Follow these steps to replace the fuser unit:
 |
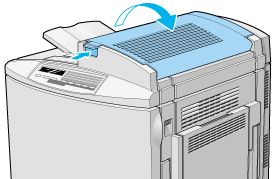
Push the lever and lift the printer's top cover.
|
 |
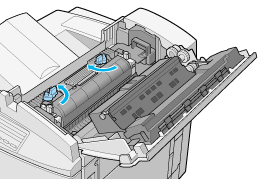
Turn the two fuser oil roll levers inward, as shown below.
|
 |
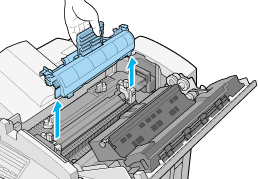
Hold the fuser oil roll by the handle and lift it gently out of the printer.
|
|  |
Note:
|
| | -
Keep the fuser oil roll in a safe place during the replacement procedure of the fuser unit.
|
| | -
If oil gets on your skin or clothes, wash it off immediately.
|
| | -
Do not touch the white roll surface of the fuser oil roll.
|
| | -
The roll should always be kept horizontal. Do not tilt or lean it against anything. Doing so might cause oil to leak and impair print quality.
|
 |
Turn the two fuser unit levers inward by 90 degrees to release the fuser unit from the printer.
|

| |
Note:
|
| |
The two levers spring upward when they are turned inward.
|
 |
Hold the fuser unit by the handles and lift it straight out of the printer.
|

 |
Remove the new fuser unit from its package.
|
 |
Hold the new fuser unit by the handles and lower it until it is secure inside the printer.
|

 |
Push and turn the two fuser unit levers outward by 90 degrees, as shown below.
|

 |
Replace the fuser oil roll by lowering it into the printer, making sure that the two side flaps fit into their corresponding slots on the fuser unit.
|

 |
Turn the two levers outward such that they rest above the fuser oil roll.
|

 |
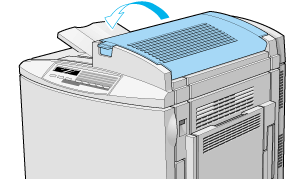
Gently close the top cover until it clicks.
|
Second transfer roll
Replace the second transfer roll after replacing the fuser unit.
Handling precautions
Always pay attention to the following handling precautions before replacing the second transfer roll:
-
Do not touch the surface of the second transfer roll. Doing so may impair print quality.
Replacing the second transfer roll
Follow these steps to replace the second transfer roll:
|
|
Open the right cover.
|

|
|
Raise the two levers of the second transfer roll.
|

|
|
Lift the second transfer roll off the right side cover of the printer.
|

|
|
Remove the new second transfer roll from its package.
|
|
|
Hold the new second transfer roll by the levers and lower it into the hollow on the right side cover of the printer.
|

|
|
Push the two levers downward.
|

|
|
Close the right cover.
|


[Top]
| Version 1.00E, Copyright © 2001, SEIKO EPSON CORPORATION |

