|

Network Guide
|
|
Network Software / EpsonNet Print
Configuring the Printer Port
Follow the steps below to configure the printer port. The printing speed differs depending on your selection.
 |
For Windows Me/98/95/2000/NT 4.0: Click Start, point to Settings, and then select Printers.
|
For Windows XP/Server 2003: Click Start and then Printers and Faxes.
 |
Right-click the target printer, and then click Properties.
|
 |
For Windows Me/98/95: Click the Details tab, and then click the Port Settings button.
|
For Windows XP/Server 2003/2000/NT 4.0: Click the Ports tab, and then click the Configure Port button.
 |
Make the appropriate settings for the desired port.
|
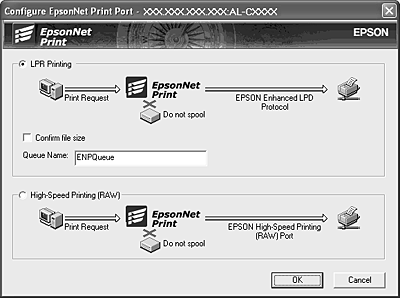
LPR enhanced printing:
Select the LPR Printing radio button, and then specify the queue name (up to 32 characters). LPR enhanced printing sends a print job to the target network printer without spooling all of the print data. LPR enhanced printing is faster than LPR standard printing.
LPR standard printing:
Select the Confirm file size check box, and then specify the queue name (up to 32 characters). Print data is spooled by the computer before being sent to the target network printer.
 |  |
Note:
|
| | |
When the print data size is 20 MB or more, we recommend that you use LPR enhanced printing.
|
|
High-speed printing:
Select the High-Speed Printing (RAW) radio button. The Epson high-speed printing port sends a print job to the target network printer without spooling all of the print data. High-Speed printing is faster than the other two printing methods.
 |
Click OK.
|
If you select the High-Speed Printing (RAW) radio button and if the printer does not support High-Speed printing, or if you fail to connect to the printer, an error message appears. Follow the message to remedy the problem.

[Top]
| Version NPD0677-00, Copyright © 2005, SEIKO EPSON CORPORATION |

