 |
|
|||
 |
||||
Enlarge or Reduce Size Printing
You can fit the size of your data to the size of paper you print on. There are two ways to enlarge or reduce the size of your data.
Fit to Page (Windows only)
Proportionally enlarges or reduces the size of your data to make it fit the paper size you have selected in the Output Paper list.
Proportionally enlarges or reduces the size of your data to make it fit the paper size you have selected in the Output Paper list.

Custom
Lets you define the percentage you want to enlarge or reduce a data.
Lets you define the percentage you want to enlarge or reduce a data.

Fit to Page (Windows only)
You can fit the size of your data to the size of paper you to print on.
 |
Open the printer driver window.
|
 |
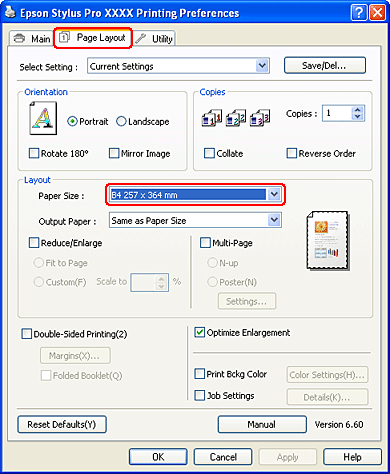
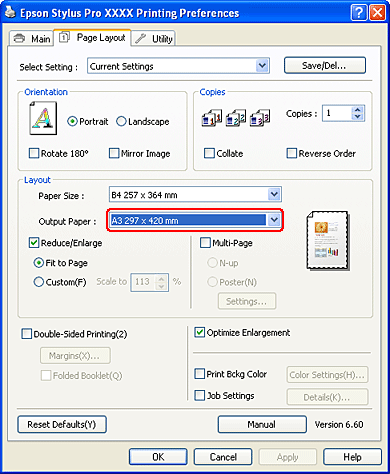
Click the Page Layout tab, and then select the same paper size as the paper size of the data.
|
 |
Select the paper size that is loaded in the printer from the Output Paper list.
|
Proportionally enlarges or reduces the size of your data to make it fit the paper size you have selected for the Output Paper.
 |
Check the other settings, and then start printing.
|

Custom
Lets you define the percentage you want to reduce or enlarge.
For Windows
|
Open the printer driver window.
|
|
Click the Page Layout tab, and then select the same paper size as the paper size of the data.
|
|
Select the paper size that is loaded in the printer from Output Paper.
|
|
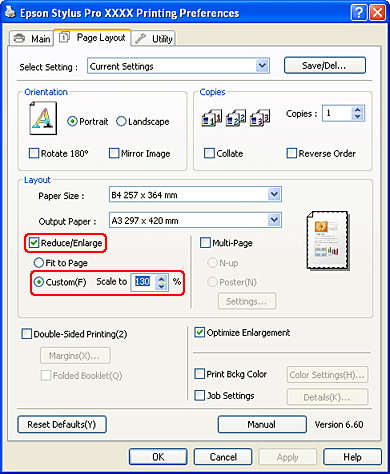
Select Reduce/Enlarge, and then click Custom.
|
Click the arrows next to the Scale box to select a proportion from 10 to 650%.
 |
Check the other settings, and then start printing.
|
For Mac OS X
|
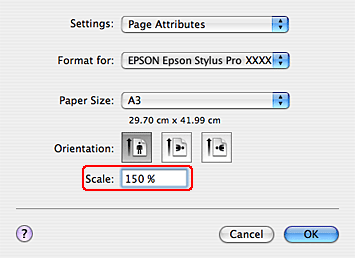
Open the Page Setup dialog.
|
|
Select the printer and paper size that is loaded in the printer.
|

|
Set the value for Scale.
For Mac OS X 10.5: 1 to 10000% For Mac OS X 10.3.9 to 10.4: 1 to 400% |
|
Check the other settings, and then start printing.
|