 |
 |
|
||
 |
||||
Color Adjustment by the Printer Driver
You can adjust colors using the printer driver during printing by setting one of the following two color systems.
EPSON Standard (sRGB)
Adobe RGB
Furthermore, when you set manual color adjustment (by selecting Custom for Windows or Advanced Settings for Mac OS X), you can perform fine tuning of the color and brightness. Use this function if the application does not support color management.
For Windows
 |
If the application supports color management, refer to the table below to adjust color management settings in the application.
|
|
Application
|
Setting of Color management
|
|
Adobe Photoshop CS3/CS4
Adobe Photoshop Lightroom
Adobe Photoshop Elements 6/7
|
Printer Manages Colors
|
|
Other Applications
|
No Color Management
|
Using Adobe Photoshop CS3
 |
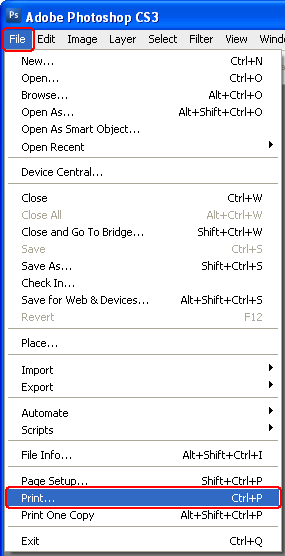
Open the File menu and select Print.
|
 |
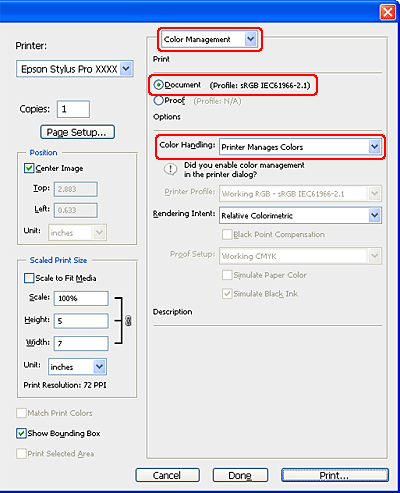
Select Color Management. In the Print section, select Document and choose Printer Manages Colors for Color Handling. Click Print.
|
When using this function with an application which does not support a color management function, you need to perform the color matching process from step 4.
 |
Open the printer driver window.
|
 |
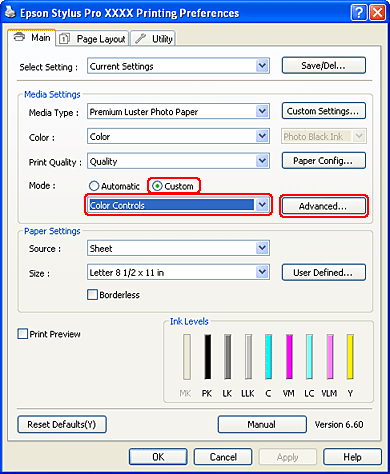
In the Main menu, select Automatic or Custom.
|
 |
Select the method for the color adjustment.
|
If you select Custom for the Mode to set manually, select Color Controls, and then click Advanced.
 |
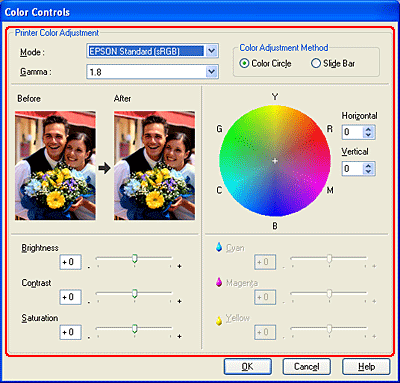
Make the necessary settings.
|
See the online help of the printer driver for detailed information.
 Note:
Note:|
You can perform the color adjustment by checking the sample image on the left side of the window. You can also use the color circle for the fine color adjustment.
|
 |
Check other settings, and then start printing.
|
For Mac OS X
 |
If the application supports color management, refer to the table below to adjust color management settings in the application.
|
|
Application
|
Setting of Color management
|
|
|
Mac OS X v10.5
|
Mac OS X v10.3.9 to v10.4
|
|
|
Adobe Photoshop CS3/CS4
Adobe Photoshop Lightroom
Adobe Photoshop Elements 6
|
Printer Manages Colors
|
No Color Management
|
|
Other Applications
|
No Color Management
|
No Color Management
|
Using Adobe Photoshop CS3
 |
Open the File menu and select Print.
|

 |
Select Color Management. In the Print section, select Document and choose Printer Manages Colors for Color Handling. Click Print.
|
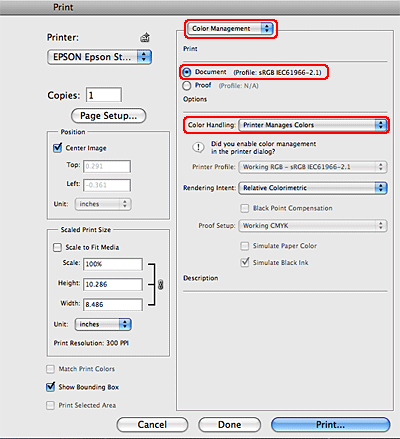
When using this function with an application which does not support a color management function, you need to perform the color matching process from step 4.
 |
Open the Print dialog.
|
 |
For Mac OS X 10.5, select Color Matching, and then select EPSON Color Controls.
|

 Note:
Note:|
When using Adobe Photoshop CS3/CS4, Adobe Photoshop Lightroom and Adobe Photoshop Elements 6 in Mac OS X 10.5, select EPSON Color Controls in Step 1.
|
 |
Open the advanced settings dialog.
|
For Mac OS X 10.5:
Select Print Settings, and change Color Settings if necessary. If you adjust the color manually, click Advanced Color Settings.
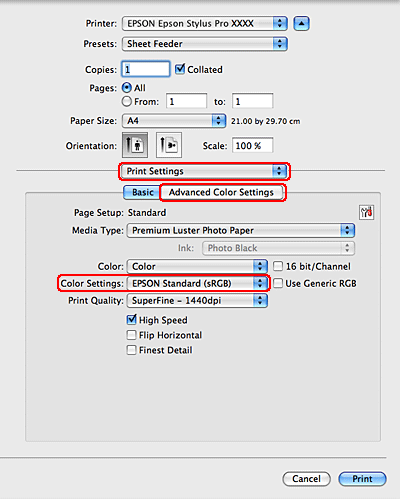
Select Print Settings, and change Color Settings if necessary. If you adjust the color manually, click Advanced Color Settings.

 Note:
Note:|
If you use Adobe Photoshop CS3/CS4, Adobe Photoshop Lightroom and Adobe Photoshop Elements 6 for Mac OS X 10.5, clear the Use Generic RGB checkbox. When you use another application, select the checkbox.
|
For Mac OS X 10.3.9 to 10.4:
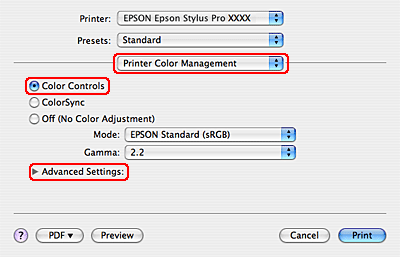
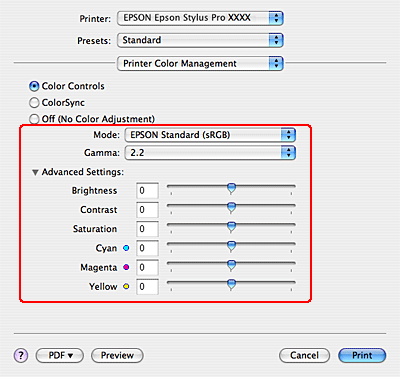
Select Printer Color Management, and click Color Controls, and then click Advanced Settings.
Select Printer Color Management, and click Color Controls, and then click Advanced Settings.
 |
Make the necessary settings.
|
See the online help of the printer driver for detailed information.
For Mac OS X 10.5:
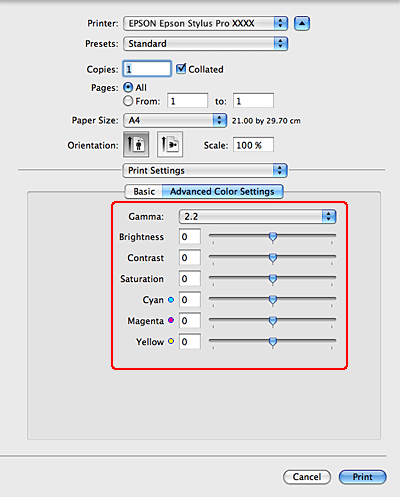
For Mac OS X 10.3.9 to 10.4:
 |
Check other settings, and then start printing.
|
