|

Reference Guide
|
|
Various Printing Options
Watermark Printing
 Paper Loading
Printing the watermark for Windows
Printing the watermark for Macintosh
Creating your own watermark for Windows
Creating your own watermark for Macintosh
Watermark printing allows you to print a text-based or an image-based watermark on your document.

 |
Note:
|
 | |
This feature is not available with Mac OS X.
|
|
Paper Loading
Load paper in the printer.

[Top]
Printing the watermark for Windows
 |
Access the printer driver software.
|
 |
Select the desired Size setting for the original print data under Paper Options on the Main menu.
|
 |
Select the desired Type setting under Paper Options on the Main menu.
|
 |
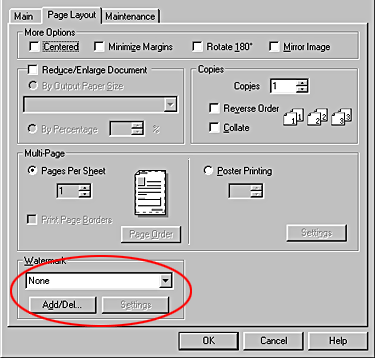
Choose the desired watermark from the Watermark list on the Page Layout menu, and then click Settings.
|
 |
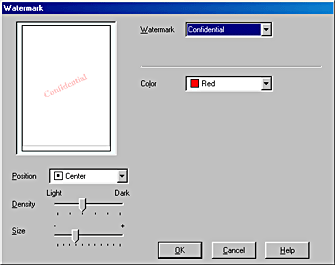
Specify the necessary settings for the watermark. You can change the position and size of the watermark by dragging it within the preview window at the left.
|
 |
Click OK to return to the Page Layout menu.
|
 |
Click OK to close the driver settings dialog box.
|
 |
Print the data from your application.
|
[Top]
Printing the watermark for Macintosh
|
|
Access the printer driver software.
|
|
|
Select the desired Paper Size setting for the original print data on the Page Setup dialog box.
|
|
|
Click OK to save the setting and close the dialog box.
|
|
|
Select the desired Media Type on the Print dialog box.
|
|
|
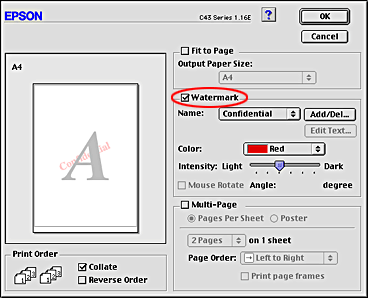
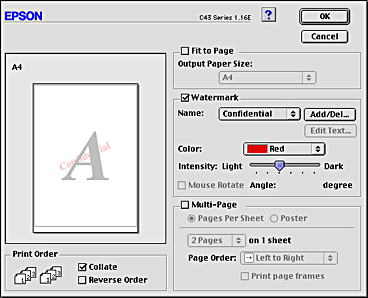
Select the Watermark check box in the Layout dialog box, and then choose the desired watermark from the Name list.
|
|
|
Specify the necessary settings for the watermark. You can change the position and size of the watermark by dragging it within the preview window at the left.
|
|
|
Click OK to save the setting and close the dialog box.
|
|
|
Click Print to start printing.
|
[Top]
Creating your own watermark for Windows
You can add your own text-based or image-based watermarks to the watermark list.
|
|
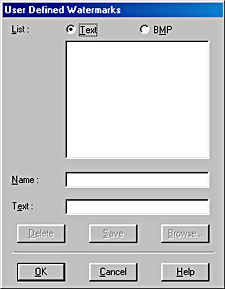
Click Add/Del under Watermark on the Page Layout menu. The following dialog box appears.
|
|
|
To use an image file as a watermark, select BMP. Click Browse to specify the bitmap file you want to use, and then click OK. Type a name for your watermark in the Name text box, and then click Save.
|
To create a text-based watermark, select Text. Type your text in the Text text box. The text that you enter will also be used as the watermark name. If you want to change the watermark name, type a new name in the Name text box, and then click Save.
|
|
Click OK to return to the Page Layout menu.
|
[Top]
Creating your own watermark for Macintosh
You can add your own text-based or image-based watermarks to the watermark list.
|
|
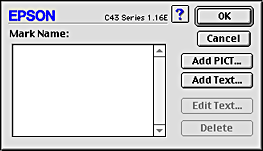
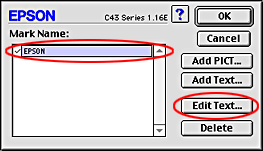
Click Add/Del beside the Name list. The following dialog box appears.
|
|
|
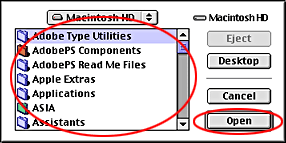
To use an image file as a watermark, click Add PICT. Specify the desired image file, and then click Open.
|
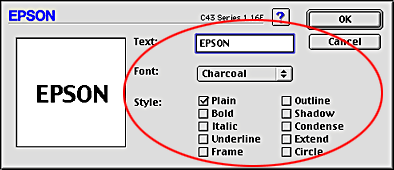
To create a text-based watermark, click Add Text. Type the text in the Text text box, select a font and a text style, and then click OK.
|
|
The image file name or the watermark text appears in the Mark Name list in the Watermark dialog box. To change the name of an image watermark, select it from the list, and then type a new name. When a text watermark is selected in the Name list, you can edit the text or change the font and text style by clicking Edit Text.
|
|
|
Click OK to add your watermark to the Name list in the Layout dialog box.
|
[Top]
| Version 1.00E, Copyright © 2003, SEIKO EPSON CORPORATION |


