![]()
Reference Guide
|
|
Index |
|
Search |
|
Glossary | |||||
|
|
Contents |
|
Help |
|
||||||
|
|
|
|||||||||||||||||||||||||||||||||
Printer Software Functions / For Users of Mac OS 8.6 to 9.x
Defining a custom paper size
In the Page Setup dialog box, you can change the paper size, specify the paper orientation, rotate your document by 180 degrees, reduce or enlarge your printout, and adjust the printable area.
Choose Page Setup from the File menu of your application. The Page Setup dialog box appears.
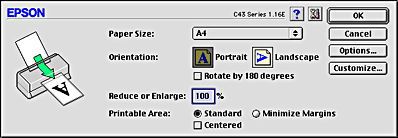
You can make the following settings in the Page Setup dialog box.
|
Paper Size |
Select the paper size that you want to use. If you want to define a custom paper size, see Defining a custom paper size. |
|
Orientation |
Select Portrait (tall) or Landscape (wide) to change the orientation of your printout. To print close to the bottom of the page, select the Rotate by 180 degrees check box. |
|
Reduce or Enlarge |
Use this setting to reduce or enlarge the print size of your document from 25% to 400%. |
|
Printable Area |
To center the printout, select Centered. To increase the printable area, select Minimize Margins. Do not select Minimize Margins when using Premium Glossy Photo Paper.
Note: |
You can define a custom paper size. To do so, you can either create a new paper size, or base your custom paper size on a pre-existing paper size. Refer to the appropriate section below.
If the appropriate paper size is not included in the Paper Size list in the Page Setup dialog box, follow the steps below to define a new custom paper size.
 | In the Page Setup dialog box, click Customize. The following dialog box appears. |
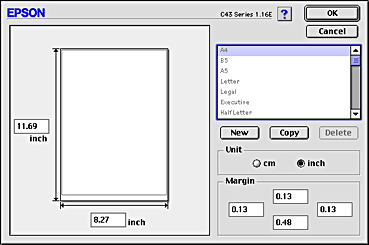
 | To define a new paper size, click New. The dialog box now allows you to enter a name for the new size. |
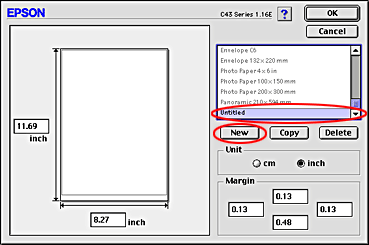
 | Type a unique name for the paper size in the Paper Size list. |
 | Specify the measurement unit as either inch or cm. |
 | Enter the width and the height of your paper by typing the text in the appropriate text boxes. |
 | Specify the margins by typing in the Margin text boxes or by manipulating the preview image. |
 | Click OK to return to the Page Setup dialog box. |
You can define up to 100 paper sizes. The paper size names you create will appear in the Paper Size list.
To delete a custom paper size, click Customize, select the paper size from the list in the Custom Paper dialog box, and then click Delete.
Follow the steps below to copy an existing paper size to use as a template.
|
| Select the existing paper size to be copied and click Copy. |
|
| Specify the measurement unit as either inch or cm. |
|
| Specify the margins by typing in the Margin text boxes or by manipulating the preview image. |
|
| Click OK. |
 Previous |
 Next |
| Version 1.00E, Copyright © 2003, SEIKO EPSON CORPORATION |